
While often overlooked, the drain stopper plays a pivotal role in ensuring the functionality and hygiene of our sinks and bathtubs. Whether you’re faced with a malfunctioning stopper or just looking to upgrade, this guide will offer step-by-step insights into replacing it like a pro.
Identifying the Type of Drain Stopper You Have
Before diving into the replacement process, it’s pivotal to identify the type of stopper you’re working with, as this determines the removal and installation method.
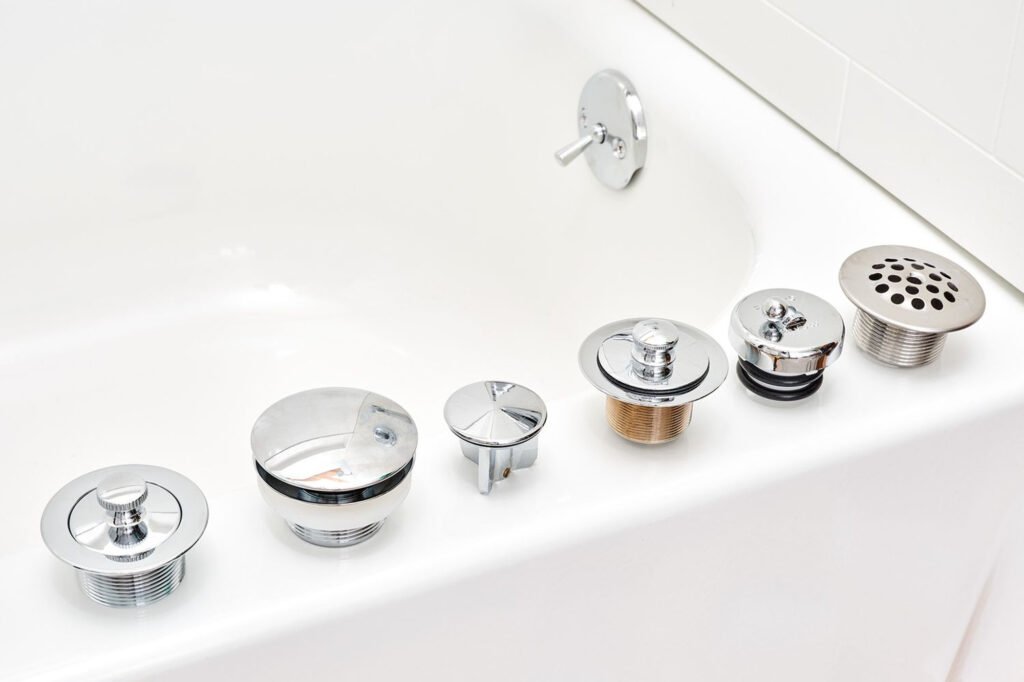
Pop-Up Stopper
- Description: Pop-Up Stoppers are prevalent in bathroom sinks. These function with a series of rods underneath the sink. The stopper pops up when the rod is pushed down, and vice versa.
- Identification Features: Look for a stopper that can be maneuvered using a pivot rod behind the faucet. You’ll often see a noticeable plug that rises above the sink level.
Toe-Touch Stopper
- Description: Toe-touch stoppers are user-friendly devices that require a simple push (often with the toe, hence the name) to open or close.
- Identification Features: They usually have a cap on top, which you can push to lock or release the stopper.
Push-Pull Stopper
- Description: As the name suggests, these stoppers are operated by pushing or pulling a knob.
- Identification Features: They generally have a noticeable knob above the drain, which can be pushed or pulled to control the stopper mechanism.
Flip-It Stopper
- Description: These stoppers operate without a lever mechanism. Instead, you manually flip the stopper to either a horizontal or vertical position to control water flow.
- Identification Features: They appear as a flat disc or cylindrical knob that can be flipped manually.
Trip-Lever Stopper
- Description: Trip-lever stoppers are a bit more complicated and often come with bathtubs. They combine the functionalities of both drain stoppers and overflow plates.
- Identification Features: Look for a lever on the overflow plate on the front of the bathtub. This lever controls the stopper, which might be hidden from view.
Why is Identification Essential?
- Customized Approach: Each stopper type has its unique removal and installation requirements. Knowing the type ensures a smooth replacement process.
Removing the Old Drain Stopper
Before introducing a new sentinel to guard your drain, the old one needs to bow out. Here’s how to bid it farewell:
Safety First
- Water Supply: Ensure the water supply to the sink or bathtub is turned off. This step might seem redundant, especially if you’re working on the drain, but it’s always better to be safe.
- Protective Measures: Place a towel or cloth over the sink or tub’s base. This protects the surface from potential scratches and provides a soft landing for any tools or parts that might slip from your grip.
The Removal
Depending on the stopper type, the removal process varies:
- Pop-Up: Often, you’ll need to go beneath the sink. Here, you’ll find the pivot rod connected to the tailpiece. Pinching and releasing the clip holding them together can disengage the rod, allowing for the stopper’s removal.
- Toe-Touch: Unscrew the cap to access the internal mechanism. From here, you can usually unscrew the stopper from its position.
- Push-Pull: This type can typically be unscrewed counterclockwise by hand or using pliers (with protection to prevent scratching).
- Flip-It: Gently turn the stopper, and it should pop out.
- Trip-Lever: These require a bit more effort. You must remove the overflow plate (2-3 screws usually secure it). Then, pull out the linkage system. The stopper usually comes out with the linkage.
Post-removal Clean-up
Once the old guard is out, it’s clean-up time:
- Drain Debris: Over time, stoppers collect a medley of soap residue, hair, and other debris. Clean the drain opening, ensuring it’s free from obstructions. This not only ensures effective drainage but can also help in the easier installation of the new stopper.
- Old Seals: If there’s an old seal or gasket, it’s best to remove it and replace it with a fresh one to ensure optimal sealing when the new stopper is installed.
Purchasing the Right Replacement
With the old stopper out, it’s time for a trip to the hardware store (physical or online). Here’s what to consider:
Compatibility Matters
- Size: Drain stoppers aren’t one-size-fits-all. Ensure the one you buy fits the drain’s diameter. Taking the old stopper
Why Replace Drain Stopper
We face some common waste drain problems. Like leakages, Overflow of water, and such things. And the old can be displaced or can be broken down. Sometimes, even regular maintenance cannot solve these. In this circumstance, you’ll need to replace the basin waste instantly. In addition to improving the looks of your bathroom, a basin waste drain replacement is more helpful.
Your upgraded basin waste drain stoppers can earn you some style points!
Basin Waste Drain Stopper Selection

The most conventional kind of waste is plug and chain. Also, one of the most popular basin waste designs is the Click-Clack, Push Button, or Sprung basin waste because it has a perfect basic design. This basin waste is simple to operate and appears clean and stylish. But this does not drain as quickly as plug and chain wastes. Moreover, there is more basin waste, like Flip-top waste and Pop-Up Basin Waste. But we suggest you use basin waste similar to what you have used before.
Tools You Will Need to Insert
To replace the old basin waste, you will need the following tools:
· The new Basin Waste
· A pair of adjustable pliers
· A rag/dry cloth for cleaning
· Plumbers putty/ silicone gel
How To Replace Your Basin Waste Drain Stopper
Follow these simple steps to do that.
- Step 1: Remove The Old Drain stopper
Firstly, you’ll need to ensure the water is not running. After that, disconnect the trap tailpiece from the waste strainer. Now, it’s time to remove the old waste drain.
You will see a hexagonal nut below the basin and with the waste. You need the adjustable plier to unscrew it. Hold on to the basin waste from above so it will not move around while unscrewing. After removing the nut and washer, lift the basin wastes. Now, you are pretty much at the next step of the task.
- Step 2: Clean The Basin Properly
When you change the waste drain, it is essential to ensure the basin is nice and clean. So, it would help if you cleaned up the basin with a dry cloth (microfiber cloth). Also, you’ll see some old putty or silicone leftover in the sinkhole. Use a sharp object to remove those, but do it gently without harming the basin.
- Step 3: Dismantle the Waste Drain
Probably, you’ve got your new basin waste assembled. But you cannot install it this way. So, remove the push button, the rubber washer, and the hexagonal nut from the body.
- Step 4: Apply Silicone Gel or Plumber Putty
Apply some silicone gel or plumber putty at the entrance around the sinkhole. Moreover, a sealant gun can be used to spread a coating around. Silicone gel or plumber putty will help to improve the strength of holding the basin waste and prevent leakage. Now, you can insert the new basin waste into the hole.
- Step 5: Place the Basin Drains
Drop in the new basin waste into the sinkhole. If the waste has two slots on either side of its body, ensure the holes are fully aligned with your basin’s Overflow. These overflow holes prevent Overflow while leaving the faucet open for a long time.
- Step 6: Apply Silicone or Putty Upside Down
You’ll see the down end of the waste coming out at the bottom of the basin. Here, apply some silicone or putty at the upper threaded area of the body. In addition, if possible, then push the silicone into the spaces between the basin and the waste.
- Step 7: Attach the Nut and Washer
Now insert the rubber washer first and then the hexagonal nut. After that, use the plier to tighten it enough so the basin waste fits all right. At the same time, tighten the nut and apply pressure or hold the waste’s topside to avoid it from spinning.
- Step 8: Wipe and Clean the Basin
After all that, some leftover silicone or putty came out from the gaps on both sides of the basin. You can use the cloth piece to wipe these from there. Now, give your bay a nice and tidy bath. A bowl of fresh water with drops of dish soap or detergent can help you better.
- Step 9: Execute the Basin Waste with the Trap
It’s time to attach the trap tailpiece with your newly installed basin waste. If you’ve removed the basin before, fit it wherever it followed the same direction as before. Then attach the tailpiece nut and screw it up properly. Also, give the seal time to dry and get it hard enough.
- Step 10: Set the Button
Now set the push button at the top of the basin waste by screwing up the spins clockwise. Make sure not to tighten it very hard.
- Final step: Test the Waste Drain Stopper
All the hard work comes to an end. Let’s see if you have done it well or not. It’s time to test the basin waste. Hit the push button continuously. Check whether it is working perfectly or not. Even the basin waste fits tight or not. Then, run the water supply to check whether the overflow line is clear. Now, prevent the leakage.