
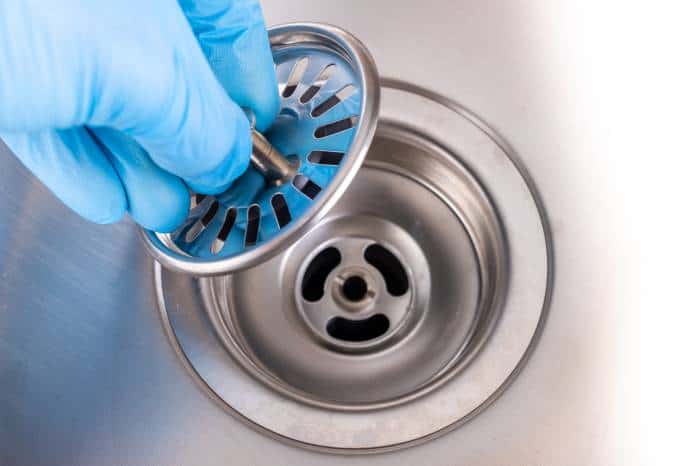
What is a Sink Stopper?
A sink stopper is an entity that uses sanitation to close a trash outlet firmly. When the sink stopper shuts the leakage hole, the part loads with water or different fluids. These are distinct from caps because caps are set over a gap while sink stoppers drive into the opening.
A sink stopper with a pull or push rod restraint at the drain is extraordinary modernized ease. However, when they are fulfilled, sink stoppers fall flat. When they act, they are irritating. It is maintenance you can perform yourself.
The Ultimate Guide to Fixing a Sink Stopper: Tips, Tricks, and Techniques
There’s no denying the convenience a sink stopper brings. Whether washing dishes, shaving, or simply enjoying a quick hand wash, the trusty sink stopper ensures that water stays where you want it to. But what happens when this little hero faces its challenges? Fear not. This comprehensive guide walks you through fixing a sink stopper and ensuring a smooth sink operation for the years to come.
Recognize the Signs
Before diving into the repair process, it’s essential to identify the signs that your sink stopper needs attention:
- Stuck in one position: If your stopper doesn’t move up or down.
- Slow drainage: Water takes longer than usual to drain out.
- Visible damage: Physical wear and tear on the stopper.
Understand the Mechanism
Different sinks have different stopper types:
- Push-to-pop: Pressed down to close and pressed again to open.
- Lift-and-pivot: Lever-activated.
- Toe-touch: Pushed with the toe to open and close.
Recognizing the type will help tailor the fixing approach more effectively.
Prepare the Tools
A successful repair requires the right tools. Most of the time, you’ll need:
- Pliers
- White vinegar
- Baking soda
- Clean cloth
- Bucket
Initial Cleaning Process
A lot of stopper issues arise from accumulated debris. Mix equal parts of white vinegar and baking soda. Pour this solution down the drain and let it sit for 30 minutes. Rinse with hot water. This might alleviate minor blockages and improve stopper function.
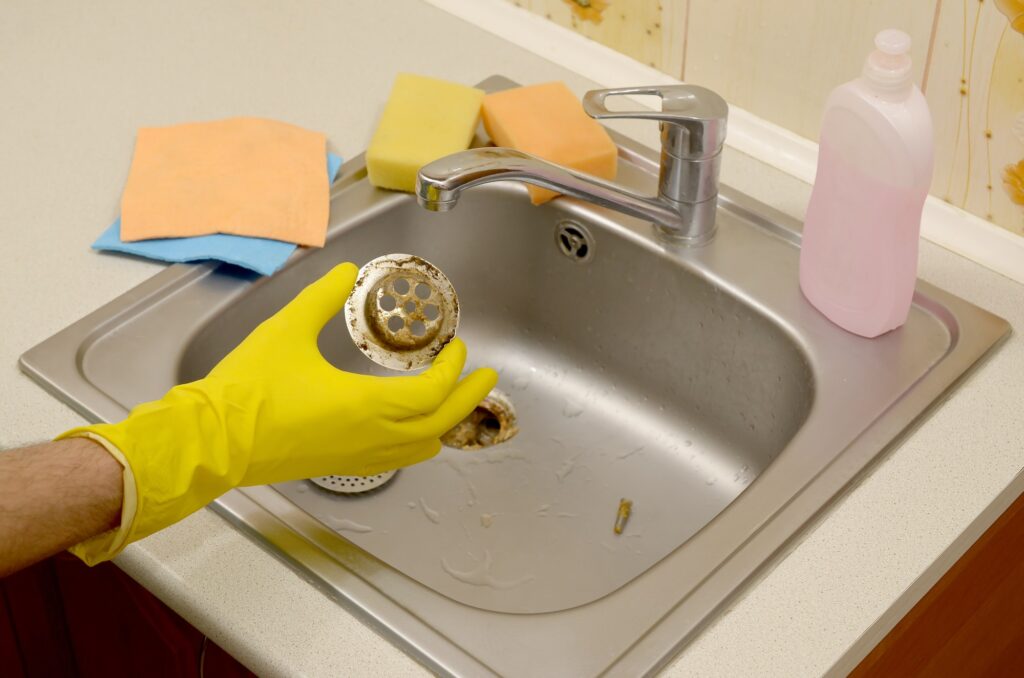
Dismantling and Inspection
If the cleaning doesn’t solve the problem:
- Place a bucket beneath the sink to catch any residual water.
- Locate the pivot rod beneath the sink — it connects to the stopper tailpiece.
- Use pliers to loosen the pivot rod nut. Once loosened, you can pull out the rod, releasing the stopper.
- Inspect the stopper for any damage or excessive grime. Clean if necessary, or consider a replacement.
Reassemble and Test
Once cleaned or replaced:
- Insert the stopper back into the sinkhole.
- Re-insert the pivot rod through the tailpiece, ensuring it connects with the stopper’s bottom.
- Tighten the pivot rod nut using pliers.
- Test the stopper by lifting and pressing the lever. Ensure smooth operation.
Prevention is Better than Cure
Regularly clean the sink stopper to prevent debris build-up. A monthly checkup and the vinegar-baking soda solution can extend the stopper’s lifespan.
A sink stopper might seem like a trivial component of your bathroom or kitchen, but its seamless operation is crucial for routine tasks. By understanding its mechanism, maintaining regular cleaning, and knowing how to fix minor issues, you can save on potential repair costs and enjoy an uninterrupted sink experience. Always remember, sometimes the tiniest components require the most attention. So, the next time your sink stopper acts up, you’ll be well-equipped with the knowledge and confidence to tackle the issue head-on!
Stage 1: Tools and Materials
You must explore popup assembly when you move to the market to acquire a substitution stopper. They come with a linkage and lift. Generally, you can get the linkage bar with the ball—a stopper without purchasing the popup assembly. I selected to substitute the popup parts. The cost is meager, and I start with all the distinct elements.
A slide joint-plier is a decent means to have a close. It requires a screwdriver and a moveable wrench. A sealant of some variety will be necessary. Revealed is a receptacle of a handyman’s clay as I was busy supplanting the spring-up body. My handyman’s clay has an advice line that declares it cannot be used with plastic or marble.
Stage 2: Anything Goes Beyond?
It is enticing to imagine something confined to one more part. You can organize the capacity of the stopper by controlling the working rod by holding the plug set up or curving it in some way or another. In certainty, elements have deteriorated or broken from corrosion and should renew.
Stage 3: Initial Marks
There are guidelines on the popup assembly bundle. However, I took in certain items I wanted I had understood toward the start. The guidelines on the bundle I got for this task say to stop the sink’s water supply. That is not required. However, a receptacle under the channel linking and paper towels adjacent is a sharp observation.
You might smell trench gas if an apartment remains abandoned for a long time. Run water with a water channel in any place, and you will resolve the issue.
The elements on this P trap are plastic. I did not require the slide-shared plier to slacken them. Any P traps brass, wrench, or plier would be essential to free the holding bolts. Free both retainer nuts with a catch pan below the P trap and set the P trap in the pan.
Step 4: Detach the lifting rod Parts.
Tweak the ends of the C-shaped retainer clip collectively. Push off the end of the linkage bar.
Step 5: Slacken the Popup Parts Retainer Nut
The early popup assembly is the element and has an alloy-retaining bolt below the basin. Slacken it with the plier.
Step 6: Exclude the Complete Rim
Once the popup fixing bolt is obscure, some turn to move the popup assembly after and ahead to unfix the early sealant under the wide rim at the base of the basin. Drive up on the popup assembly and grip the completed edge with a couple of pliers. Keep it and change the body of the pop assembly to unfasten it from the completed flange.
Stage 7: The Old Sealant
You will view this thing when the completed rim is unfastening from the frame about the popup assembly. The early sealant breaks and cracks away without any difficulty. Cut all. It would not need the nearly-completed rim. Dispose of it.
Stage 8: Wonder!
The rusted metal completed rim was screwed into strings within the frame of popup parts. But, the new chrome-encrusted plastic finished ridge screws onto lines of the spring-up body. The width of the strung region on the completed flange is incredible. Even think about sliding into the opening for it in the lower part of the drain. Luckily, a plastic resin is shaped into the lower part of the sink.
Stage 9: Use Sealant to the Flange
Use a dab of sealant throughout the completed rim wherever it reaches the basin. Push it into the opening and under the drain. Review to ensure an adequate bond and no holes or air holes. Add more glue if necessary. It would help if you cleaned away enough adhesive later. Try not to use more than needed.
Stage 10: Sealant to Close Leakages
You added some glue to the excellent finish of the strung part. The plan of popup assembly could permit spillage due to rib fits rather than inside the body. Enhance the body into the opening in the sink from underneath the drain. Turn the body onto the completed ridge without upsetting the finished spine and seal. Keep the popup body to get together. So, the fitting for the linkage leads to the back of the drain, its side to the cliff.
Stage 11: Fix the Body Bolt
Fix the bolt on the popup parts body. This plastic item is prepared to fit with fingers and no-pliers. Fix the frame bolt as your fingers can fix it. Be cautious that the frame of the popup assembly doesn’t turn away from its place. Hold it during tightening.
Stage 12: Assemble
Release the new channel stopper into the opening in the completed rim from the peak of the basin. Find the linkage bar into its space and take the circle at the lower channel fitting with the rod. Turn the linkage retainer bolt onto the body of the popup parts, with the finish of the linkage bar in its most descending manner. Pick the opening in the lift pole parts that best fits it. Drive the space over the end of the linkage rod with the wiry C retainer part.
Stage 13: Arrange the Linkage into the Retainer Bolt
Push the linkage into the bolt. There is a Teflon ring in the frame of the popup parts. Pinch to make sure it is yet in place. It has an open space to fix the ball on the linkage bar—a similar white plastic drops when the linkage retainer nut is removed from the body.
If the popup parts are metal, be mindful not to fix the nut a lot with a couple of pincers. A piece of the metal nut is a dainty washer mounted in the bolt, which can push out. You will experience issues getting the bolt to keep the ball on the linkage bar so there are no breaks when it does. Here, the plastic popup assembly unit is a benefit across the metal.
Stage 14: Fix the P trap
Drop the plastic confining cleaner and bolt from the early popup parts for the P trap. Adjust the bolt and plastic cleaner on the unique spring-up picking. Fit the P-trap and turn both of its bolts places. Fix properly.