
Are you looking for a quick and easy guide to installing your new AquaSource Faucet? If you’ve invested in a top-quality product, you’re definitely in the right place! Our guide will walk you through the steps necessary to get your new faucet up and running, so let’s dive right in and look.
From shutoff valves to basin wrenches, our guide covers all the essentials you need to ensure everything runs smoothly. With our expertise and help, there’ll be no tears shed and no time wasted – just a sparkling installation! Get ready to transform your sink into an AquaSource success story.
What You’ll Need
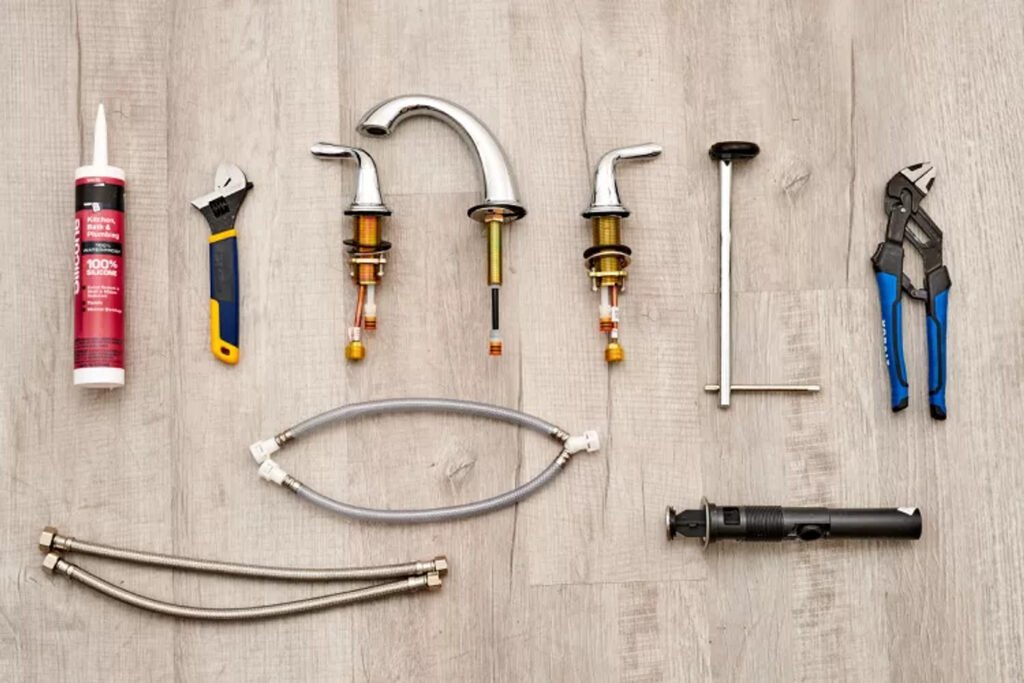
Equipment / Tools
- Basin wrench
- Channel-type pliers
- Adjustable wrench
Materials
- New AquaSource faucet
- 2 Water supply tubes (if needed)
- Silicone sealant
Shut Off the Water
Start by shutting off the water to your old faucet. You can usually close the shutoff valve at the fixture.
Disconnect the Water Supply Tubes

When installing a brand spanking new AquaSource Faucet, you want to try not to spray yourself in the face with water when testing is time.
To avoid this potentially embarrassing situation, always make sure that you disconnect the water supply tubes before installing your new faucet. This step is key to success, and you’ll be glad you did it!
Remove the Old Faucet
- Start using a wrench or other tool to unscrew any nuts or bolts holding your old faucet. Keep tabs on any components you remove – try taking pictures before separating them from the system so you’ll know exactly how they go back together later.
- Next, if a retaining nut under the sink blocks access to other pieces of the faucet assembly, remove it and set it aside.
- Now that everything is out of the way use premium-grade cleaners (like Viessman-approved products) to thoroughly scrub before starting fresh with your new AquaSource model. All that’s left now is to towel dry all components.
Tips
How faucets are affixed differs depending on the make and model. Some screws secure two tailpieces to hold it in place, while others have a single screw at the center. Some even require three screws– one for each handle tailpiece and another for the nozzle.
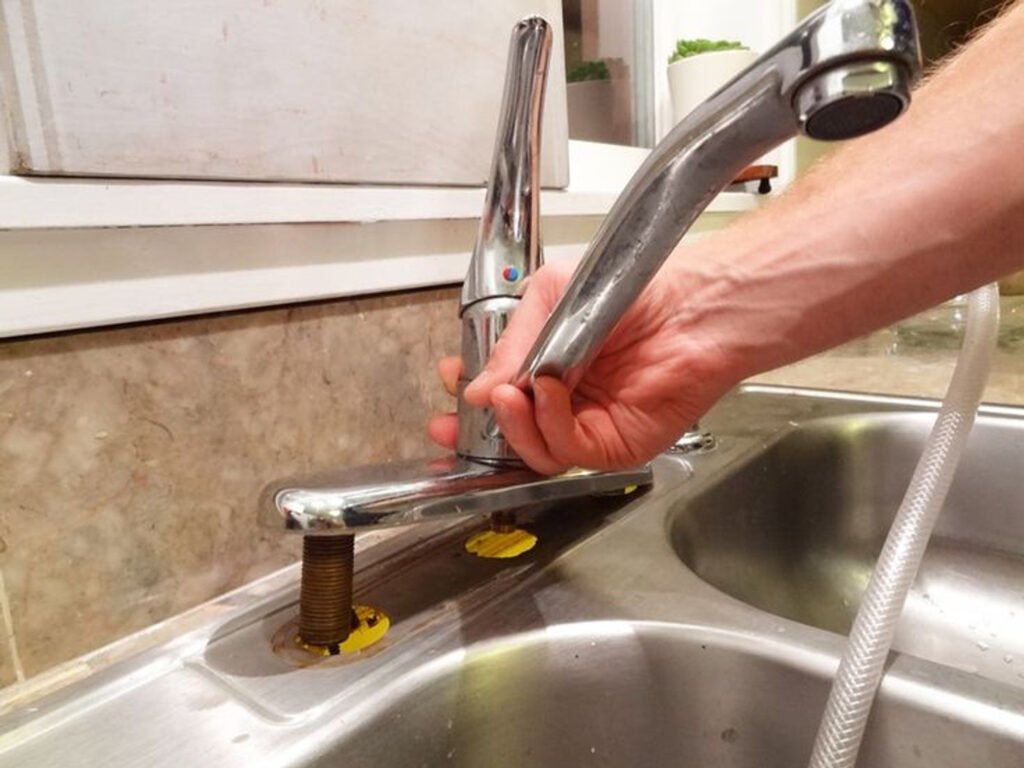
Attach the New Faucet
- First, refer to your AquaSource faucet instruction manual to ensure your sink is fully prepared to accept a new faucet installation. This usually entails turning off the water supply under the sink and plugging the sink drain (after removing all items from within).
- Once your sink is ready for its new companion, lift the faucet into place over the holes in your sink. You may need a drill or other tool if you have pre-drilled holes.
- Now screw the mounting nuts onto the tailpiece on the underside of the faucet—from here, the installation will be an absolute breeze!
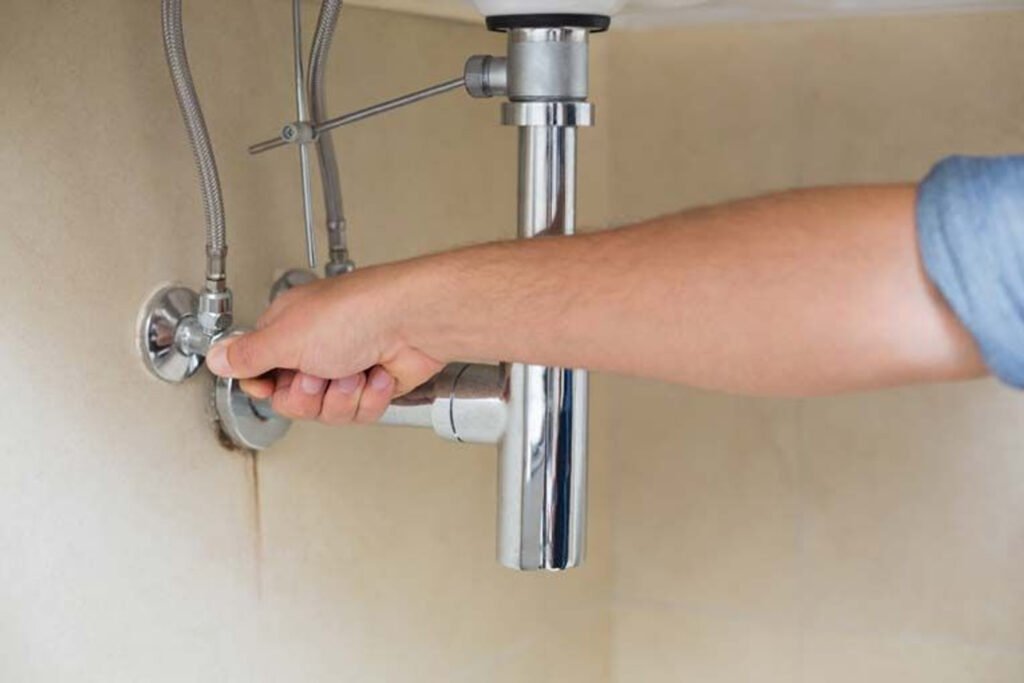
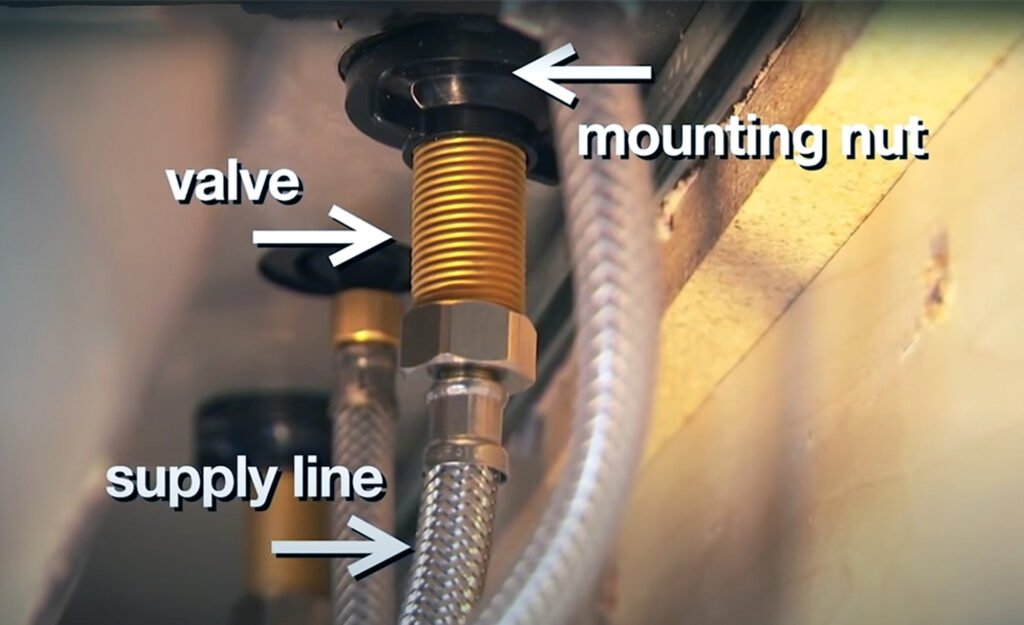
Connect the Water Supply Tubes
- First, ensure all the parts are present and accounted for before starting. You should have two flexible poly tubes (or ½ inch rigid copper) for hot and cold water plus 2 shutoff valves, a washer and nut, and any other parts that came with the faucet.
- Next, switch off the main water supply and drain any remaining water pressure by turning on your sink’s taps. Then disconnect the old distribution pipes from behind the sink while being careful not to hurt yourself or damage surrounding areas.
- If you’re working with copper piping, cut only what’s necessary and clean up any burrs present at each end of your pipe before moving forwards.
- If you went for flexible poly tubing, then now would be an excellent time to spend a few extra minutes ensuring there are no kinks in your bends —they could cause leakage issues down the line! Also, remember to use high-quality connectors when attaching everything else, as inferior ones may fail at some point due to overworking or general wear and tear.
- Run your eye over all connections again now that they’re set to ensure they’re snug enough without being overly tight or loose—this is key!
- Finally, attach both shutoff valves, ensuring they are facing opposite directions, before turning on your main water supply one last time.
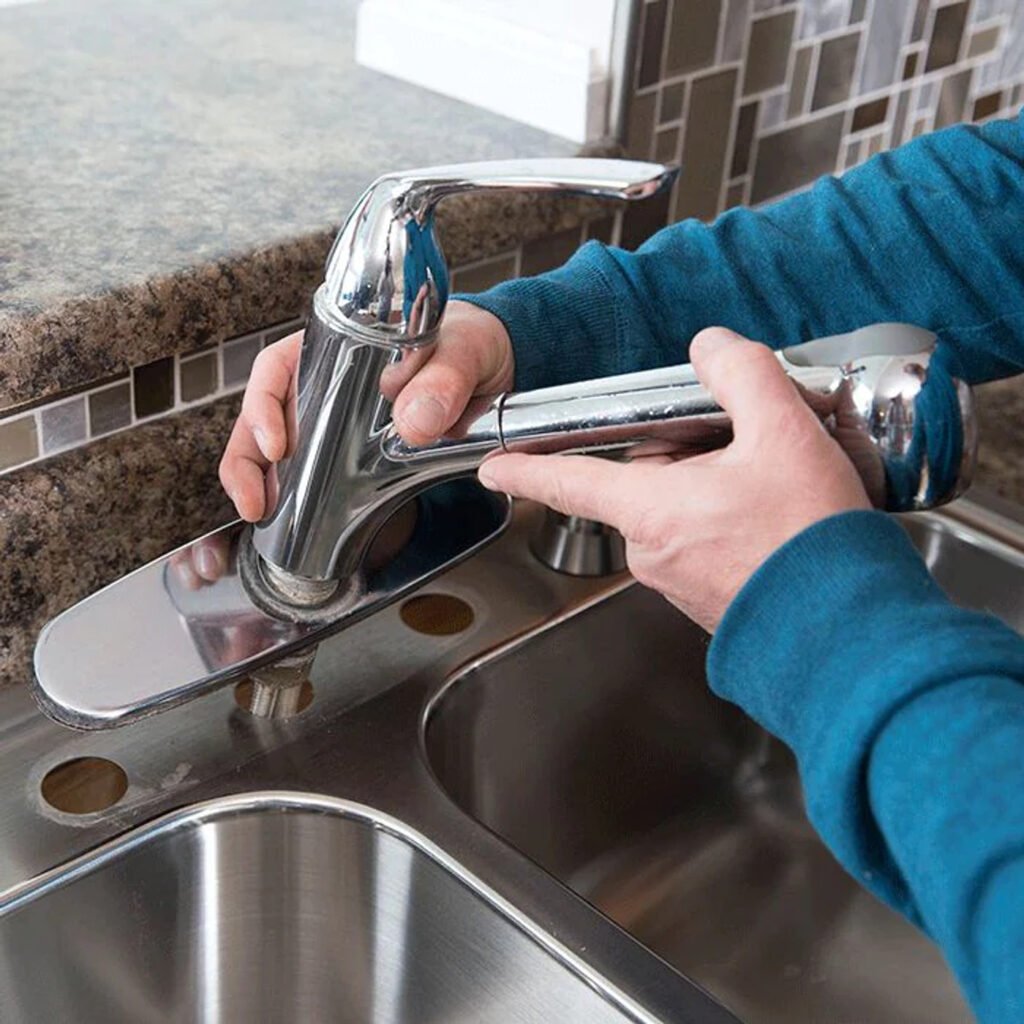
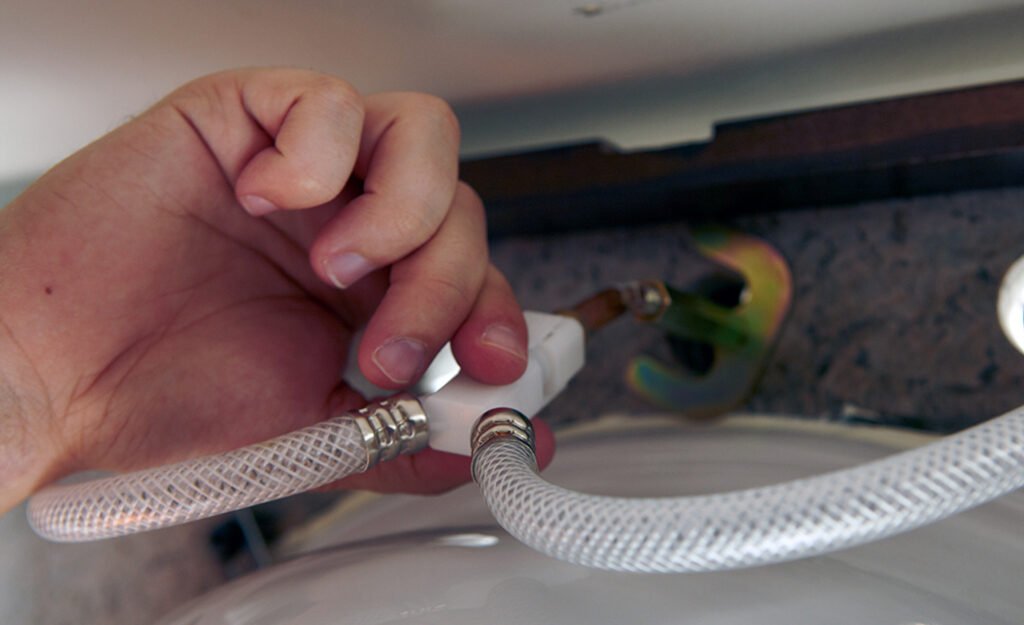
Connect the Linking Hose (If Needed)
If you’ve purchased an AquaSource faucet with two handle valves and a center spout, you know how much of a headache installing it can be. Fortunately, connecting the linking hose is one of the more straightforward steps. Making the much-needed connections only takes a few notched pliers or an adjustable wrench.
Once that’s done, you must attach one end of the hose to the faucet body. Firmly tighten both ends with your tools, and you’re ready. However, remember that this same procedure needs to be done for each of your handle valves – three total – to ensure that your AquaSource faucet is stable and able to function without any hitches.
It may seem arduous, but there’s no need to worry because your hard work will ultimately pay off. By making sure everything is securely connected beforehand, you can avoid any potential complications later on when using your faucet.
Begin Installing the Drain Assembly
You Can Do It
Installing a new AquaSource Faucet requires the right components and tools. You must begin with the drain assembly before putting your faucet together. Here are the steps to follow:
Disconnect the old drain pipe from your sink and remove the existing assemblies.
Then, separate the pop-up drain assembly, which may have been loosely assembled in the package. Remove your plug from your drain body, then slide off the installation nut and foam gasket from the underside of the drain body.
Apply washer/silicone sealant to the bottom of the tailpiece (this depends on the type of faucet).
In some models, the drainage assembly is inserted from above, while for others, it’s inserted from below through an opening.
- For the first type, you will insert from above, pushing down until firmly seated against the sink surface, then tighten the collar nut onto the threaded portion of the tailpiece.
- For the second type, push the pop-up rod through the opening and press it onto the gasket before clamping down the connecting housing nut onto the flange. The top nut needs to be tightened into position as well.

Turn on water lines to check the tightness and make sure there is no leakage around connections or nuts;
At this point, you should be able to see any water deposits leaking out that may indicate leaky connection points.
Finally, reattach the handles and test again.
Especially while pushing down on all handles at once with intense hard pressure like a lever action movement when checking for any indications of leaks or sound coming. This indicates wherever handles need to be tightened appropriately and need re-tightening.
Install the Pop-up Stopper
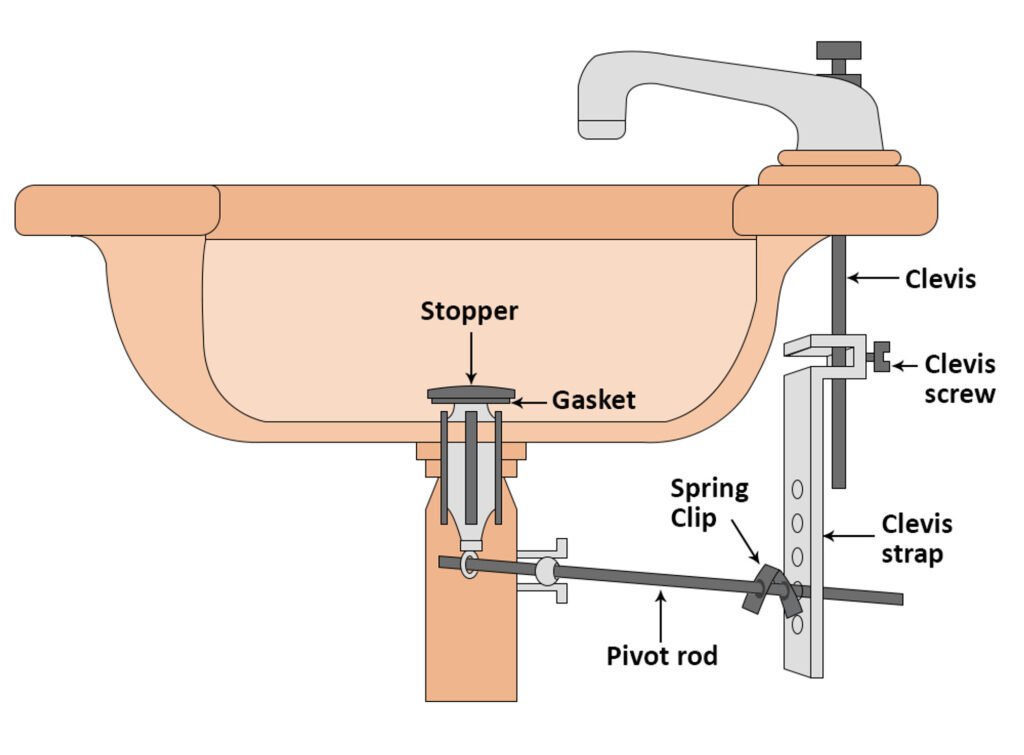
- Begin by disconnecting the drainpipe from the sink basin by installing a Moen drain adapter upside down (if necessary) on the drain basin.
- Next, remove the old pop-up stopper from its cylinder assembly by unscrewing it counterclockwise until it detaches from the bottom.
- Finally, wrap Teflon thread seal tape around any threads of both ends on each part of your new pop-up stopper assembly and screw them clockwise onto the cylinder base—you should feel it click into place when you’ve got it right.
Complete the Installation
Turn on the faucet after reattaching the drain to the sink’s tailpipe. If there are any leaks, you can feel them by running your finger around the water supply and drain fittings. If necessary, use a wrench to tighten them slightly. Let the water run for a few minutes, as some faucet leaks may take time to appear.
To check if your pop-up drain is leaking, follow these steps:
- Lower the plug in the sink and fill it with water.
- Let all the water out and look for leaks around the drain under the sink.
FAQ
Q: How tight should the drain and water supply fittings be?
A: The fittings should be snug but not too tight. While ensuring they are secure enough so there are no leaks, you also want to avoid over-tightening them, which can lead to damage or leakage.
Q: Should I use plumbers’ tape or Teflon thread seal?
A: Yes, using plumbers’ tape or Teflon thread seal on the drain and water supply fittings is essential. This will help create a water-tight seal and prevent any leaks from occurring.
Q: What kind of wrench should I use when tightening the fittings?
A: A basin or adjustable wrench is usually recommended for this task. It’s best to avoid using a pipe or channel wrench, as these can cause damage to the fittings. Also, it would be best not to overtighten the fittings, which can cause damage.
Q: How long should I let the water run when testing the faucet?
A: You should let the water run for at least a few minutes to check for leaks. If you don’t see any obvious signs of leakage, wait another couple of minutes to be sure. Even if there is no visible leakage, a slow leak may happen, which would only become apparent after some time.
Wrapping up
Installing your new AquaSource Faucet is quick and easy! Follow the above steps, double-check all connections, and enjoy your brand-new faucet.
Hofen Sanitary, with over 20 years in manufacturing faucet hardware, offers you the best installation guide and quality products. We hope these tips have been helpful—all the best with your new faucet!