
Centerset Bathroom Faucet: An Overview
The world of bathroom fixtures and faucets can be diverse and complex. From different designs and operations to installation methods, each faucet type offers unique aesthetics and functionality. One common type you might encounter when revamping or setting up a new bathroom is the “Centerset Bathroom Faucet.” Here’s a dive into understanding what it is.
A centerset bathroom faucet, often referred to simply as a centerset faucet, is a type of faucet where the spout and handles are combined on a single base unit. It’s one of the most common faucets for standard bathroom installations due to its compact design and ease of use.
Benefits
Installing a Centerset bathroom faucet in a new vanity top can be daunting. Don’t worry – with the right tools and know-how, and you’ll have that shiny, sparkling faucet mounted in no time!
This step-by-step guide will give you the information you need to assemble a Centerset bathroom faucet masterfully. Plus, tips for troubleshooting any hiccups along the way – that’s far more helpful than just ‘winging it!’
So take a deep breath, grab your tools, and follow this trusty guide to installation success to pat yourself on the back for another job well done.
Hofen Tips

To simplify this task, it is best to perform it before securing the counter at the bottom of the dresser – precisely how we completed our project.
What You’ll Need
Equipment / Tools
- Plumber’s putty or silicone caulk
- Rubbing alcohol
- Phillips-head screwdriver
- 2 Adjustable wrenches
- Basin wrench (if installing the faucet with vanity top already in place)
Materials
- 4-inch center set single-handle cartridge faucet
- Water supply lines
- stainless steel, brass, plastic, zinc alloy
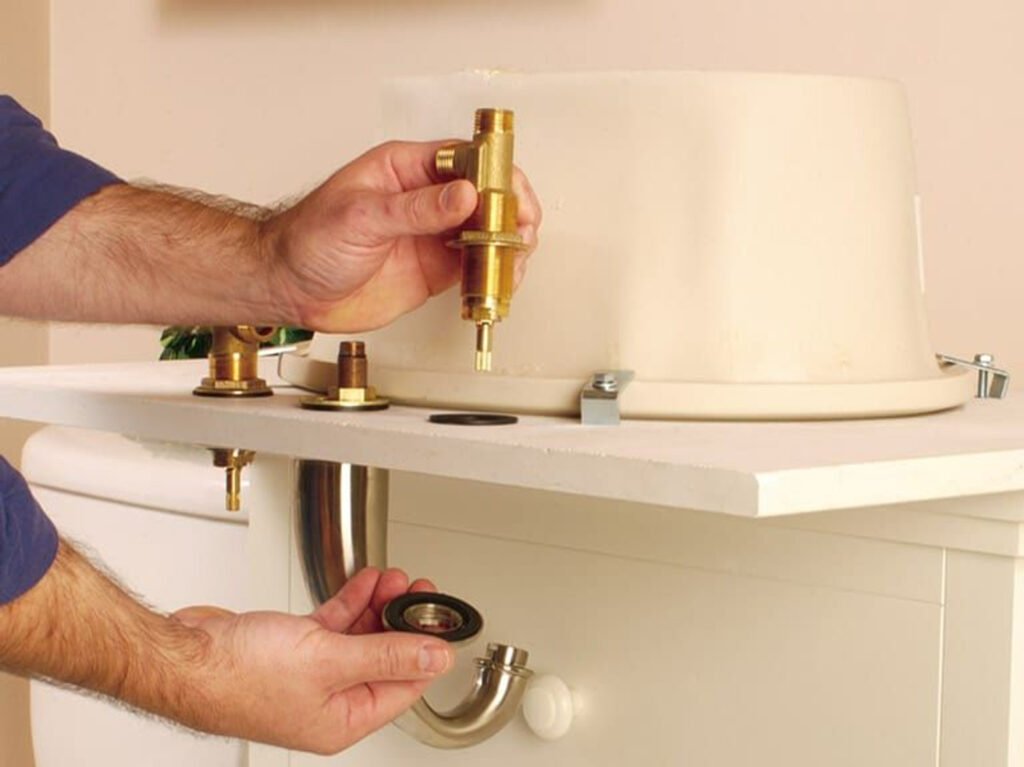
Insert the Faucet Into the Vanity Top

From decorative faucets to rugged hot and cold conversion faucets, inserting the faucet into the top of the vanity is an essential step in the installation process. However, follow a few suggestions to make it fit into the overall bathroom design.
- First, attach the mounting brackets to the threaded rods on either side of the faucet. Use a wrench to tighten the retaining nut and expose some threads.
- Place the plastic washer on top of the vanity and over the faucet hole, ensuring it’s properly aligned! This will help stop future leaks far less than placing it on the spacer or liner.
- Tilt the mounting bracket and carefully transfer the faucet body and threaded rod one at a time into the faucet tabs. Tighten all screws and make sure the faucet terminals are aligned flat with the base – this step will prevent future leaks from being generated.
- If necessary, use glue to secure the relevant parts or matching products. Then reapply the glue and wait for it to cool completely. For example, flowing rubber or ABS turbulent flow agent.
- Finally, hook up the gas or open valve bed to the water mono- whether you want it cold/hot – and you’re done! Check your corresponding parts for leaks; if there are leaks, just repair them with a non-metallic Saito paste!
So be sure to follow the above steps to fasten the permanent freestanding manifold in the liner sensibly – because this is a really “silly” situation, especially when someone is trying to take advantage of the “just – work – product” that is currently on the market and is having some difficulty trying to spend the usual amount of time.
Fasten the Faucet to the Vanity Top
Securing a faucet to the vanity top may seem intimidating, but it doesn’t have to be! An adjustable or basin wrench can come in handy for space-saving measures.
You’ll want to gather simple materials such as plumber’s putty or thread seal tape, a pair of channel lock pliers, and plumbers’ line up/line out tool(s).
- First, line up your mounting bracket underneath your sink into place so it is level with both sides of your vanity top. Fasten using screws provided with a power drill if needed.
- Next, gently press down on the base of your sink faucet to create a leak-free seal – making sure everything is tight! If need be, consider adding an extra layer of protection with some caulking or putty for further prevention against leaks.
- After completing this step, open up both valves to allow water flow. Finally, test seals by turning on hot water for about 30 seconds and then turning it off again – if everything was installed correctly, no leaks should occur! Voilà! You’ve successfully fastened your faucet to the vanity top.
Hofen tips

- In addition to tightening screws properly, the padding underneath items connected to your vanity top is essential to avoid cracking the material over time.
- Matching brackets will usually accompany each corner but sometimes require cutting different pieces depending on your particular need(s). Placing items such as washtubs in between supports can provide more space when necessary; apply wedges securely underneath them while being mindful not to damage other areas around them.
- Lastly, ensure drain lines are correctly connected before finalizing any installation part. These simple steps will help ensure that all connections stay strong and increase lifespan expectancy without fail!
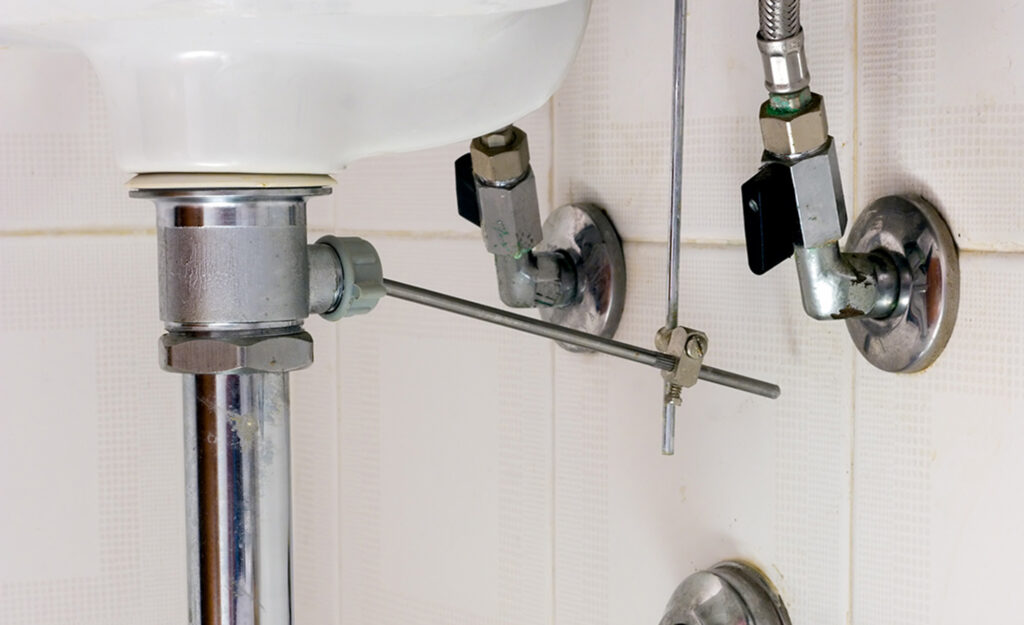
Attach the Water Supply Lines

Attaching the water supply lines to your vanity can seem daunting, but if you have the correct tools and knowledge, it is actually quite simple.
- Start by sealing the bottom of the drain flange with waterproof sealant. Once that is done, take the fixing nut and tighten it firmly to the tailpiece of the drain flange located at the bottom of your vanity.
- To ensure your water supply lines are securely in place, you must use connection fittings such as elbows and couplers when connecting various water lines.
- Depending on what type of material you are connecting your water supply lines to can determine how tightly they should be attached. For example, if you’re using copper pipes, use elbow fittings and connect them using the solder-joint connection.
- If you’re attaching plastic pipes together, make sure to use connectors specifically designed for the plastic piping system. Once this has been completed, all left is to turn on each tap running through the vanity to test for leaks!
Hofen tips
- In addition to having all the necessary parts for your DIY plumbing project, there are also a few safety tips to consider.
- Firstly, ensure that all valves and shutoff points along your route have been correctly installed so that no one will be harmed from contact with hot or cold water if any leaks occur.
- Lastly, always having someone nearby when working with plumbing projects experience does matter when attempting such tasks!
Clean Up Any Residual Sealant

Flip the top over for freestanding counters and use isopropyl alcohol to clean any creosote or caulking remnants that oozed out from underneath the drain flange.
Attach the O-Ring and Pop-Up Drain Tailpiece

Installing or replacing the pop-out tailpiece and rubber O-ring is crucial when modifying a bathtub. There are just a few simple steps to secure the O-ring and pop-up drain tailpiece together.
- First, adjust the O-ring to the proper size and hold it in your hand.
- Then, attach the O-ring to the drain flange tailpiece. Use a tool with a diameter appropriate for the size of that particular tailpiece to secure it; usually, a tool made of wood/plastic ball bar is recommended for easy handling.
- The third step is to lock the poppet housing in place and torque this part by rotating the housing back around to the failed opening; ensure that the failed opening faces backward and tighten the bolt on the fluid tail.
Hofen tips
Of course, there is an important caveat: apply rotational force with patience and endurance stress with patience and endurance proper! Take your time applying more pressure; overpressure can cause the rubber O-ring to become brittle, crack, or both – too many sets prevent the gel protection from closing, a condition that can sometimes prevent you from covering the assembly or attaching it.
Insert the Pop-up Ball/Pivot Rod

Insert the pop-up ball and pivot rod into the tether plate, ensuring that the latter is placed in the bottom hole of your pop-up drain. Securely tighten on a retaining nut afterward by hand.
Install the Drain Lift Rod
- Pop-up drains are operated by a lift rod connected to the drain. A U-bolt and bracket secure the rod in place, enabling effortless raising and lowering of your sink’s stopper.
- Begin by inserting the lift rod through the topmost rod hole of your faucet. Subsequently, please insert it into its appropriate flat bracket before temporarily fastening it with a U-bolt. After some final adjustments to the pop-up drain, secure this bolt attachment in its rightful position.
- Securely attach the lift rod to the pop-up drain pivot rod using spring clips. Pass it initially through one side of the pivot rod, then slide it onto both sides of the lift rod and again through what remains of the first pivot hole.
Adjust the Pop-up to 1/2-Inch Action.
Fine-tune the pop-up drain’s height to 1/2″ above the sink flange when you depress the lift rod and seal it against the drain while in its raised state. To guarantee your Pop-up’s proper functioning, ensure that both the u-clamp bolt and lift rod clamp are positioned correctly.
Install the Assembled Sink/Faucet Into Vanity
After affixing the faucet to your sink, mount the vanity onto your bathroom vanity for a complete installation.
FAQs
Q: What tool is best for tightening the O-ring?
A: A tool with a diameter appropriate for the size of the tailpiece should be used to secure it; usually, a tool made of wood/plastic ball bar is recommended.
Q: How do I adjust the pop-up drain’s height?
A: Fine-tune the pop-up drain’s height to 1/2″ above the sink flange when you depress the lift rod and seal it against the drain while in its raised state. To guarantee your Pop-up’s proper functioning, ensure that both the u-clamp bolt and lift rod clamp are positioned correctly.
Q: How do I secure the lift rod to the pop-up drain pivot rod?
A: Securely attach the lift rod to the pop-up drain pivot rod using spring clips. Pass it initially through one side of the pivot rod, then slide it onto both sides of the lift rod and again through what remains of the first pivot hole.
Wrapping up
After finishing your installation, it’s time to wash up and admire your fantastic new centerset bathroom faucet. Follow these steps correctly, and you’ll have the perfect addition to any new vanity top!
At Hofen Sanitary, our veteran team is always just a call away and ready to answer any queries regarding bathroom faucets. Whether it’s the installation process or product specifications – we’re here for you! So go ahead and enjoy your new tap with ease of mind! Wishing everyone happy washing days ahead – cheers 🙂