
Introduction
Drain stoppers are devices that plug bathtub and sink drains to prevent water, soap, and other substances from flowing down the drain. These stoppers are an improvement over standard plugs, which are often prone to tearing, warping, or even getting lost if they are not maintained tightly attached. However, drain stoppers can still become clogged with dirt, hair, and other debris, so it’s crucial to remove them for cleaning regularly.
Instructions
To avoid damaging the drain stopper or the surrounding plumbing, it is a good idea to learn the specific process for removing the type of drain stopper installed in your tub or sink. There are several drain stopper types, including lift-and-turn, push-and-pull, toe-touch, flip-it, trip-lever, and pop-up. Many models have a similar removal method, but knowing your drain stopper’s specifics is still essential. You might avoid having to make any more costly or time-consuming repairs by doing this.
How to Remove a Lift-and-Turn Drain Stopper
A lift-and-turn drain stopper is generally identified by a tiny threaded knob on the top of the stopper. A push-and-pull stopper works similarly to this type of drain stop, except the knob is fixed in position so that you may either push down or pull up the stopper. A lift-and-turn drain stopper has a knob that can be turned left and right. Turning the knob clockwise (to the left) closes the drain while turning it counterclockwise (to the right) while lifting opens it. However, there might be variations between items.
Remove the Drain Stopper Knob
- If the drain stopper is left in place, turning the knob on top of it to the left (counterclockwise) will most likely open the drain. Continue to rotate the knob in the same direction until it fully disengages from the bolt in the center of the drain stopper.
- It is crucial to note that drain stopper lids often attach to the drain-stopping bolt via a few knobs. Because most devices have a threaded connection with the bolt, you may remove most drain stoppers by turning the entire lid. There are other drain stoppers on the market that use simple twist locks to keep the drain stopper in place; if you encounter one of these items, turn the drain cover until it is properly positioned, then pull up on it to remove it.
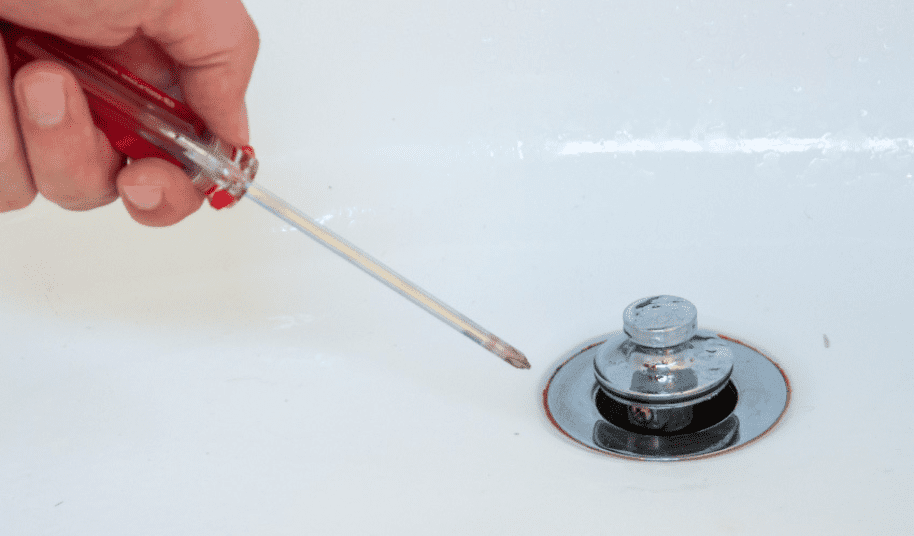
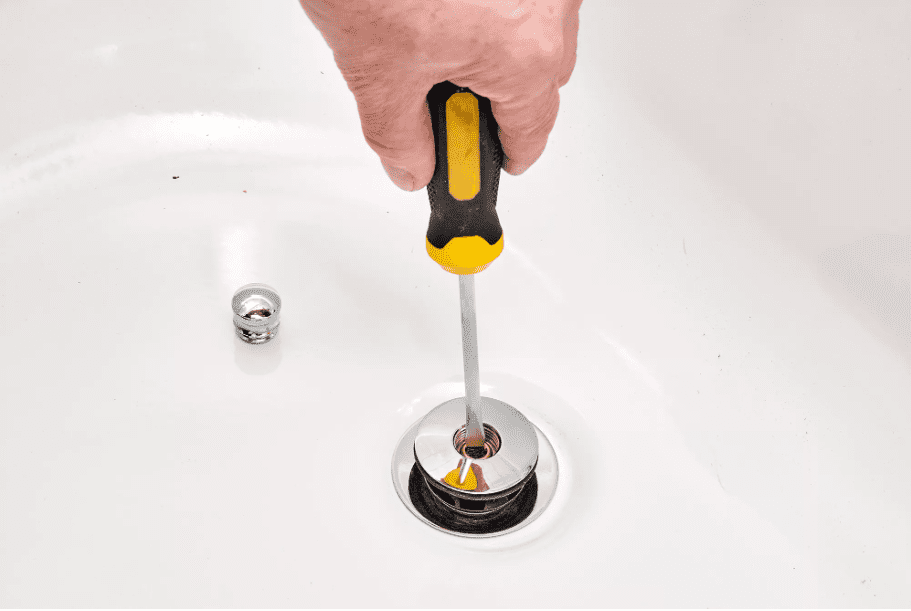
Unscrew the Drain Stopper Bolt
Remove the drain stopper by unscrewing the drain stopper bolt from the threaded hole in the center of the drain crossbar. The entire drain stopper will come out of the drain if you use a screwdriver or pliers to remove the bolt.
Inspect, Clean, or Replace
With the drain stopper removed, check it for signs of damage, such as a ripped plug, rusted threads, or a cracked lid. If any visible damage is present, you should replace the drain stopper. However, if the drain stopper is in good operating condition and you want to clean the sink and drain with a bathroom cleaner before reinstalling it, do so now.
How to Remove a Pull Drain Stopper
Push-and-pull drain stoppers, like lift-and-turn variants, are functionally identical to one another and look almost the same. The knob on top of a push-and-pull drain stopper is generally broader and smoother than a lift-and-turn drain stopper. Because they have a straightforward operating mechanism, push-and-pull drain stoppers are apparent. Press the plug down to seal the drain and pull up the knob to open it.
Unscrew the Drain Stopper Knob
A push-and-pull drain stopper’s knob is generally attached to the stopper lid, although it can also be a separate piece. If your drain stopper knob is an individual component, remove it from the stopper to access the fastening bolt.
Pull out the drain stopper knob by gripping it firmly and turning it to the left (clockwise) to release it from the stopper lid.

Remove the Drain Stopper
- Remove the separate stopper knob and lid immediately if the push-and-pull drain stopper includes either of those features. Unthread the bolt from the drain crossbar with a screwdriver or pair of pliers. Remove the stopper from the drain by lifting it out with your hand.
- On the other hand, most push-and-pull drain stoppers have a solid body rather than a lid and knob. The threaded center hole in the drain crossbar is secured with a fastening bolt that runs throughout the entire body. This reduces installation and removal time considerably. Just turn the drain stopper to the right (clockwise) to remove the fastening bolt from the crossbar and lift out the drain stopper.
Inspect, Clean, or Replace
- To check the drain stopper for damage, clean any loose hair and debris away. Examine for clear indications of tears, rusted areas, or wear, and replace the drain stopper if necessary.
- Clean drain stoppers with a bathroom cleaner to remove any soap scum or dirt accumulated in the drain or on the stopper, then replace the stopper if they are in good working order.
How to Remove a Toe-Touch Drain Stopper
A toe-touch drain stopper is a kind of stop that resides inside the drain and has a toe-touch mechanism that you may activate by pushing down on it. The drain will be closed with a single push but reopen with a second push. These drain stoppers are often circular and have a flat lid that can be textured or inscribed with the word “push.”
Open the Drain Stopper
If the drain stopper isn’t already down, lift it and push it down to open it. Removing the drain stopper while it’s closed is usually unsuccessful, and there’s a chance that you will damage the drain lid.
Twist the Drain Stopper Lid
Remove the drain lid’s fastening screw by twisting it to the right (clockwise) and firmly grasping the drain cover with your fingers.
Unscrew the Fastening Screw
Using a screwdriver or pliers, remove the drain stopper from the drain. Remove the fastening screw from the drain crossbar and lift it out of the drain to clear the drain stopper.

Inspect, Clean, or Replace
You must replace the drain stopper if it is damaged or broken. The drain stopper may be examined for damage, such as a bent plug, rusted fastening screw, or fractured lid. If the stopper is damaged but appears in good working order, remove dirt and other obstructions from the drain and off the stopper using a bathroom cleaning solution. Replace the drain stopper after removing all hair, soap scum, and other blocking objects from the sink and drain.
How to Remove a Flip-It Drain Stopper
Flip-it drain stoppers are a type of stopper that uses a flip lever to change the gasket within the drain. The gasket is compressed when the flip lever opens, allowing water to enter the drain. Still, it is squeezed and expanded when it is in the closed position to fill up the tub or sink and form a seal. These drain stoppers are held in place by an O-ring inserted into the bottom end of the drain, making them very simple to remove.
Open and Remove the Drain Stopper
A drain stopper of this essential kind does not require any tools. Pull the whole assembly firmly by twisting and pulling it up and out of the drain.
Inspect, Clean, or Replace
Remove any hair, soap scum, toothpaste, dirt, or other debris that may have been collected in the drain or drain stopper. Examine the stopper for signs of excessive wear or damage. Check for a worn, misshapen, or cracked O-ring and flip it drain stopper if necessary. If the drain stopper is discovered to be in good condition after cleaning it with a bathroom cleaning solution and reinstalling it, replace it.
How to Remove a Trip-Lever Drain Stopper
Trip-lever drain stoppers, like the flip-it stoppers, are a type of drain stopper that requires some effort to disassemble. The trip-lever drain stopper has a lever on the overflow faceplate. The plunger is operated by a rod assembly that drops vertically through the overflow drain and activates a lever. The plunger will rise or descend by tripping the handle or turning it.
When the plunger is up, water will enter the drainage system; when it’s down, a seal forms inside the drainpipe to prevent water from flowing. Due to their complex construction, these drain stoppers are prone to clogging and may be difficult to remove and replace.
Open the Drain
If the drain is not yet fully open, rotate or flip the lever to open it fully. Removing the trip-lever drain stopper while it’s closed might cause it to get stuck.
Remove the Overflow Grate
To access the trip-level drain stopper assembly, loosen the screws on the overflow grate and remove it from the tub or sink. Make sure to store the screws in a safe place for future reinstallation.
Pull out Trip-Lever Drain Stopper Assembly
Remove the trip-lever drain stopper assembly from the overflow drain pipe. Because you must pull all of the components out without breaking any, it’s a good idea to lubricate them before removing the plunger.
Inspect, Clean, or Replace
After removing the complete assembly from the overflow pipe, examine each component for signs of excessive wear or damage, such as rust, fractures, or irregularities. To prevent future difficulties, replace any parts that exhibit marks of injury.
How to Remove a Pop-Up Drain Stopper
Like a trip-lever stopper, a pop-up stopper has a complicated assembly threaded through the overflow drain. The overflow faceplate of these drain stoppers also has a lever linked to a rod assembly that descends vertically via the overflow drain. Instead of a plunger, the rod assembly is attached to a spring that sits atop a horizontal rocker arm. A horizontal rocker arm that runs through the tub or sink drainpipe controls a pop-up plug.
The spring contracts when the lever is in the open position, pressing down on the rocker’s arm and causing the plug to pop up. When the spring is relaxed in the closed position, allowing for movement of the rocker’s arm up and sealing off drains. Due to intricate mechanism design and construction, pop-up drain stoppers are prone to clogging.
Open the Drain
Remove the plug from the overflow faceplate by flipping the lever up, so it is in an open position. This makes it simple to get to the plug and drain out the rocker arm assembly.

Remove the Rocker Arm and Drain Stopper Plug.
Remove the drain stopper by squeezing the sides with your hands or a pair of pliers and pulling it straight up and out of the drain. You don’t want to pull too hard to remove the plug, stopper, and rocker’s arm all at once.

Unscrew the Overflow Faceplate
Remove the screws from the overflow faceplate using a screwdriver and preserve them for later use. To get to the lever and rod assembly, remove the overflow faceplate.
Remove the Rod Assembly
Remove the rod assembly from the overflow drainpipe; keep everything intact, including the lever, rods, and spring. If the ensemble becomes clogged, apply a lubricant to loosen the spring and rods.
Inspect, Clean, or Replace
- Check the pop-up drain stopper for wear and damage, including the stopper, rocker arm, spring, rods, and trip lever. Before reinstallation, replace any stopper pieces with indications of excessive wear or damage, such as rusting, cracking, or warping, to avoid future issues. If the stopper is in good shape, clean out the drain and stopper with a bathroom cleaning solution to remove hair particles lather.
- Insert the rocker arm into the drain and begin reinstalling. Slide the stopper plug into the drain opening after inserting it through the drainpipe.
- Insert the spring and rod assembly into the overflow drain with the rocker’s arm. When the spring contacts the rocker’s arm, the plug should pop up in its correct position. Then, using screws that you set aside, secure the overflow faceplate and test the drain stopper to confirm that it is functioning correctly.