
Are you ready to replace the outdated faucets with new ones? Replacing those is not too difficult, and it’s the right time to modernize your bathroom. Centre-set faucets with pop-up drains can be a good choice for your washroom and kitchen.
Continue reading as we walk you through the ten steps to install a center-set faucet with a pop-up drain. Your patience and calm temper can be the key to success when replacing a faucet with a new one. You should know the installation method, remember the most common faucet features and options, and try your luck. We wish you the best of luck!
What is a Centre-set Faucet?
Centerset faucets are like simple faucets, but they consist of a spout and handle that combine tightly to form a single unit. Ideally, you can prefer 2 center bathroom faucets to provide separate settings for hot and cold water to ensure your family’s comfort every time. Moreover, it is a highly adaptable installation faucet, and its design works well in any bathroom size.
Nowadays, center-set faucets with pop-up drain assemblies are frequently utilized in bathroom sinks. The pop-up drain stopper works mechanically to retain water in sinks. Hofen Sanitary faucet manufacturers provide center-set bathroom or kitchen faucets with pop-up drains that best suit your lavish lifestyle.
You can get according to your needs with the following essential features.
- Two handles for separate hot and cold functions
- Four or six-inch faucet centers
- The spout and handles are in a single-unit
- You can install it on sinks with three holes
Materials You Need for Installing Centre Set Faucet with Pop-up Drain Assemblies

You need to have the following materials and tools for this process:
- New center set faucet kit
- Plumber’s tape
- Basin wrench
- Bucket
- Channel-lock pliers
- Screwdriver
- Plumber’s putty
- Silicone latex caulk
After collecting all these tools, we will discuss installing your center-set kitchen or washroom faucet with a pop-up drain.
10 Steps to Install a Pop-Up Drain with a Centerset Faucet?
Let’s learn ten easy steps for center bathroom faucet installation with
a pop-up drain.
Step 1: Turn Off the Water Supply

Clear the area and remove all the essentials below the sink pop-up drain. Firstly, cut down all the water connections from the faucet or pop-up drain. Both cold and hot water supply should be closed completely. Remember to rotate the valves clockwise at the base of the supply lines.
Pro Tip: Drain manufacturers place a large bowl or bucket under the drain to collect dripping water in pipes.
It is crucial to block flooding in your bathroom or kitchen. Always place your cleaning mats down to your foot for cleaning spilled water. Lastly, open the taps to ensure no water is in the taps.
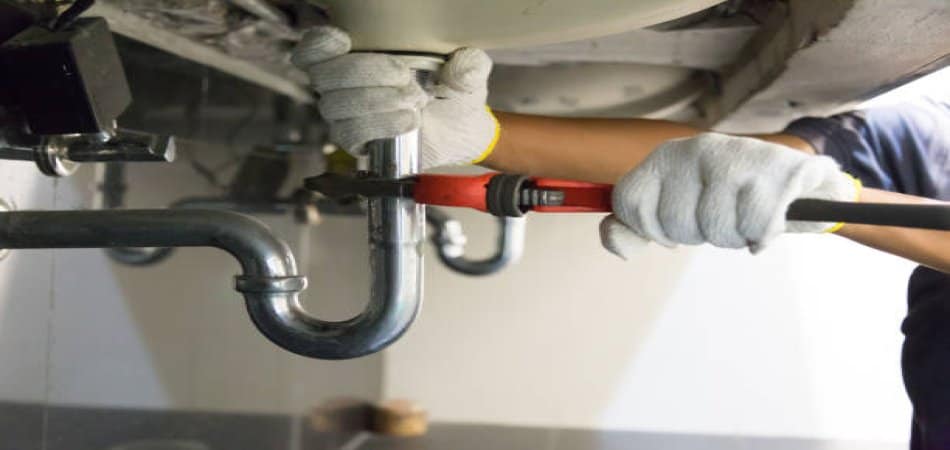
Step 2: Disconnect the Faucet From the Sink

Bend down, find the two big nuts supporting the faucet, and hold it right in place. Pick up your plier and remove these supporting nuts. Wholesale faucet manufacturers always mention on packing that your faucet contains manually-twistable plastic mounting nuts or screw nuts. To accomplish your job, choose a faucet set screw size carefully.
Step 3: Disconnect and Remove the Pop-Up Drain Assembly

After that, unplug the pop-up drain assembly and separate it from the center set kitchen faucet. Usually, pop-up drains employ a lift rod to connect faucets. Bow down on your knees and look for a lifting rod underneath your sink.
Press the clip off that connects the pivot rod with the faucet, and it’s halfway to complete. Afterward, use your hands or screw to remove the binding strap from the connecting lift rod. Still, if your kitchen faucet does not rotate, remove all the mounting nuts around the faucet base and handles.
Check the nuts and all parts of the faucets, plus the pop-up drain, for corrosion. Drip penetrating oil in a bowl and dip the nuts for a few hours, or even overnight, to remove grease or rust, if any.
Step 4: Remove the Faucet From the Sink

Stand near the sink counter, remove the gasket first, and repeat the same with the center set faucet. Don’t forget to clear all the dust, soap parts, rust, or scraping material before the new ceramic disc faucet installation. However, the method for center set faucets is slightly tricky.
You will observe a plastic gasket when you slide the rubber from the base of the new faucet. The gasket points up or down in the appropriate direction in advanced drainage systems. Pick up a knife and remove the seal of the faucet tap and bathroom sink pop-up drain.
Now, it’s time to pull up the faucet carefully and handles from the sink. Raise the faucet and other utilities and place them aside. You can now install a new faucet there.
Step 5: Assemble Your Faucet and Clean the Area

Some center-set kitchen faucets are complete, while some faucet manufacturers do not attach parts completely. They attach a guide, and you must assemble your faucet according to your space availability and sink design. At this stage, we highly recommend you follow the directions provided by the manufacturer, as every faucet is unique. So you need the manufacturer’s sanitary ware guidelines to assemble it.
When you complete the task, clear the area and remove all the pipe silicone caulk from the faucet holes or around the sink. Indeed, it will assure you a firm faucet-level seal.
Step 6: Adjust the Faucet and Gasket
Please pick up your new faucet and attach your faucet gasket at its base by yourself as your faucet supplier guides you. If you don’t find a gasket during unpacking, use a thin rope of plumber’s putty. Once you are sure you have fixed the gasket well, it’s time to insert your sink faucet.
Slowly move down the lower faucet tubes into the sinkhole to adjust it into the basin. Ensure the holes in the new faucet line up the sinkholes before installing them. Otherwise, the faucet knob keeps rotating freely and will not fit in the center.
Step 7: Center the Faucet and Attach it to the Sink
Use a suitable faucet set screw size to crank the mounting nuts. Rotate it clockwise or right-handedly until it fits well with the base. Sanitary ware manufacturers recommend applying a caulk bead between the faucet and countertop joint to avoid any leakage.
But be careful. It can harm your fingers or hands. Alternatively, you may use a caulking gun to squeeze out a thin caulk line at your desired place. If you do not caulk it properly, you may wonder why my faucet turns on itself. Then, smooth it with a balancing scale to finish the job.
Step 8: Connect the Faucet Supply Lines

Here is how you can fix supply lines with your faucet. Take out your plumber’s tape and create a tight seal along the supply lines of the faucet. Next, move towards compression fittings and manually attach all the nuts to their place, as you removed before.
Pick up your screwdriver and tighten all the nuts again, but do not overtighten to avoid damage. Finally, apply plumber’s tape to connect the water supply hoses and hot and cold water supply lines on your faucet handles. This way, you can appropriately line up the hot and cold water supply lines.
Step 9: Install the Pop-Up Drain Assembly
Your top priority should be to install the washer and gasket onto the tailpiece, and don’t withdraw your hand until they fit under the flange. After that, for safe disposal of wastewater, put the flange end into the drain hole of your sink. Caulk the joint connection to prevent leakage.
Usually, for security reasons, drainage suppliers lock a nut onto the tailpiece and tighten it to keep it from moving. Furthermore, to secure the tailpiece and drainage pipe together, line up the tailpiece with the P trap and tighten the slip nut.
Now, adjust the pivot rod in the tailpiece hole and insert the gutter pop-up drain stopper into the drain hole. Firmly tighten the pivot rod to fix it in place with a nut screwdriver.
Step 10: Attach the Faucet to the Pop-Up Drain Assembly

After successfully inserting the lift rod into the slot, slide the clevis strap on it by one or two inches. To firm the grip, mount the spring clip onto the clevis strap. Now, line up the holes on the spring clip with the holes on the pop-up stopper to fully elevate it.
Attach the pivot rod through the holes lining the center set faucet. Now check your connection by opening the faucet handle, if the pop up stopper moves down to block the sink drain you are succeeded. Congratulations, you have done it! Switch on the ball valve water tap to check the water flow. If you get the desired results, tap on your back.
In Conclusion
Centre-set faucets with pop-up drains are best for your bathroom and kitchen sinks. The latest technology inside them supports the hot and cold water flow according to your demand. A pop-up drain facilitates flawless water flow and catches the grab to avoid pipe blockage. We hope that after following these ten simple installation steps, you will get the desired results. In case of any trouble you can take the help of manufacturers at Hofen Sanitary by pressing the contact us button. Stay happy and blessed always!