
A Step-by-Step Guide
Lift-and-turn drain stoppers are popular in many modern bathrooms for their ease of use. As with all mechanical devices, there may come a time when you need to remove it, either for cleaning, replacement, or troubleshooting a drain issue. The process is straightforward and requires minimal tools. Here’s a detailed guide to help you through it:
Understanding the Lift and Turn Drain Stopper
Before jumping into the removal, it’s essential to grasp the basic mechanism of the lift and turn stopper. As the name suggests, you lift and turn (usually clockwise) to close the drain and the opposite to open it. The stopper operates using a simple screw mechanism, its primary anchor point.
What is Lift and Turn Drain Stopper?
A lift-and-turn drain stopper is a sink drain plug that can be easily lifted and turned to open or close the drain. It is usually made from plastic or metal and has a rubber gasket around the edge to create a watertight seal.
This type of drain plug is popular because it is easy to use and can be quickly opened or closed without removing it from the sink. It is also less likely to get stuck in the drain than other plugs.
How Does it Work?
The lift and turn drain stopper uses a lever system to control the release of the plug. When you lift the lever and turn the stopper counterclockwise, it opens a small slit in the plug, allowing water to drain.
The plug closes back up when you release the lever and seal off the opening. This design prevents water from flowing back out of the sink after you’ve drained it.
It’s also worth noting that this drain stopper is often easier to use than other designs. You don’t have to fumble with a small plug or try to get your fingers underneath it. The lever makes it easy to open and close without touching the dirty stopper.

What are the sizes?
Drain stoppers, including lift and turn models, come in various sizes to fit different drain openings. Common sizes are:
- 1-1/4 inch: Generally used for bathroom sinks.
- 1-1/2 inch: Often found in bathtubs and kitchen sinks.
- 2-inch: Typically used for shower drains.
- 3-inch: Used for larger drains like those in utility sinks or commercial applications.
To find the right size, measure the diameter of the drain opening where the stopper will be installed. Take a tape measure and measure the distance across the hole at the widest point. Check the manufacturer’s specifications for compatibility with your drain size.
Additionally, you should consider the length of the threaded section of the stopper, as this needs to be long enough to secure the stopper in place but not so long that it interferes with the drain’s plumbing. Manufacturer’s guidelines usually provide information on the suitable range of drain depths for each model of stopper.
It’s crucial to choose a stopper that fits perfectly. Too small, and it won’t effectively stop the water; too large, and it won’t fit into the drain at all.
Understanding the size requirements before you start the removal or installation process will save you time and effort, ensuring a smooth operation.
Why Should Remove the Lift and Turn Drain Stopper?

Lift and turn the drain stopper for a few reasons.
- If the stopper leaks, it may need to be replaced.
Leaking can occur if the rubber gasket around the plug’s edge wears out or something is blocking the drain. Either way, you must remove the stopper to inspect it and make any necessary repairs.
- If the stopper is not draining properly, it may need to be cleaned.
Sometimes, hair or other debris can get caught in the drain and cause the stopper to become clogged. In this case, you must remove the stopper to clean the drain.
- It may need to be adjusted if you’re having trouble opening or closing the stopper.
The lever on the lift and turn drain stopper can sometimes become loose over time. If this happens, you must remove the stopper to tighten the lever.
- If replacing the sink, you’ll need to remove the drain stopper.
If installing a new sink, you must remove the old one first. This means you’ll also have to take out the drain stopper.
Post-Removal Clean-Up and Inspection
Cleaning:
With the stopper removed, it’s an opportune time to clean the stopper and the drain.
- Use warm water and mild detergent to clean the stopper, removing any soap scum, hair, or other debris.
- Inspect the drain for any obstructions or buildup and clean as necessary.
Inspection:
Look at the threads on the stopper and inside the drain to ensure no damage. Damaged threads can cause the stopper to sit incorrectly or not function as intended.
Reinstallation or Replacement
If you’re merely cleaning or troubleshooting, you can reinstall the lift and turn stopper by reversing the removal steps. If replacing, ensure the new stopper is compatible with your drain size and type.
Removing a lift and turn drain stopper is a relatively simple task that can save you time and money. Whether you’re cleaning, troubleshooting a drainage issue, or replacing the stopper, this guide provides the knowledge needed to handle the task confidently. Remember always to prioritize safety and work patiently to prevent any unintentional damage.
Remove the Lift and Turn the Drain Stopper-Step by step
Now that you know why you might need to remove the lift and turn the drain stopper, let’s go over how to do it.
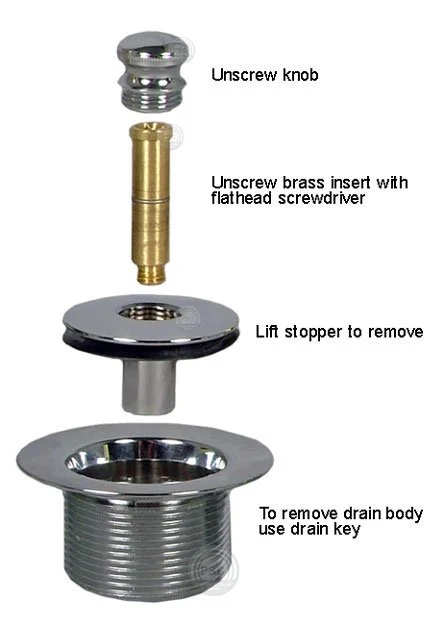
Step One: Find the screws.
The first thing that you’ll need to do is locate the two screws that hold the stopper in place. These screws are usually located on the underside of the stopper.
Step Two: Remove the screws
Once you’ve found the screws, remove them with a Phillips head screwdriver. Don’t strip the heads of the screws.
Step Three: Pull out the stopper
After the screws are removed, pull out the stopper. If the stopper is stuck, you can use a flathead screwdriver to pry it loose.
Step Four: Inspect the drain
Once you’ve removed the stopper, look at the drain to see if anything is blocking it. If you see any hair or debris, use a pair of pliers to remove it.
Step Five: Clean the stopper
You can clean the stopper with a rag or towel if it is dirty. Dry off the stopper before putting it back in place.
That’s all there is to it! Now you know how to remove a lift and turn a drain stopper.
How to Clean the Stopper?
If you need to clean the stopper, there are a few things that you’ll need.
- A rag or towel
- Some soap
- Water
Instructions:
- Step #1 Wet the rag or towel: Start by wetting the rag or towel with some water. Use a mild soap if the stopper is particularly dirty.
- Step #2 Wipe down the stopper: Use the rag or towel to wipe down the stopper, ensuring to get rid of any dirt or soap scum.
- Step #3 Rinse off the stopper: Rinse off the stopper with some clean water.
- Step #4 Dry off the stopper: Use a clean towel to dry off the stopper. Be sure to remove any water that’s pooled in the drain.
That’s all there is to it!
How to Adjust the Lever?
If you’re having trouble with the lever, you may need to adjust it.
- Step #1 Find the screws: First, locate the two screws holding the lever. These screws are usually located on the underside of the stopper.
- Step #2 Loosen the screws: Use a Phillips head screwdriver to loosen the screws.
- Step #3 Adjust the lever: Once you’ve loosened the screws, you can adjust the lever to your desired position.
- Step #4 Tighten the screws: After adjusting the lever, use the screwdriver to tighten the screws.
How to Put the Lift and Turn the Drain Stopper Back in Place?
Now, let’s go over how to put it back in place.
Step One: Place the stopper in the drain
First, you’ll need to place the stopper back in the drain. Make sure it’s positioned correctly before moving on to the next step.
Step Two: Insert the screws
Once the stopper is in place, insert the screws and tighten them with a Phillips head screwdriver.
Step Three: Test the stopper
After you’ve put the stopper back in place, test it to ensure it’s working correctly. Open and close the lever to see if the stopper moves up and down smoothly.
If everything is working correctly, then you’re all done! You now know how to remove a bathtub drain stopper and place it back.
Tips and Tricks:
You should know these tips and tricks to keep our stopper in the best condition:
- Check the screws regularly: Be sure to check the screws regularly to ensure they’re tight. Over time, they may become loose and need to be tightened.
- Clean the stopper with a rag or towel if it becomes dirty.
- Don’t force it: If the stopper is stuck, don’t force it. Use a flathead screwdriver to make it loose.
- Check for debris: Before putting the stopper back in, check for any debris that may have caught in the drain. Remove anything that you find.
- Adjust the screws: If the stopper is still not working properly, you may need to adjust the screws. Turn them clockwise to tighten them or counterclockwise to loosen them.
- Adjust the lever: Move it up or down if it is not working properly.
Now you know how to remove a lift and turn the drain stopper. You can keep your sink in top condition.
Other Types of Drain Stoppers
There are many different types of drain stoppers. The common one includes:
- Push-pull tub stopper: The push-pull tub stopper is easy to remove. Grab the knob and pull it up.
- Pop-up drain stopper: The pop-up drain stopper is attached to a lever.
- Toe-touch tub stopper: A lever near the drain operates the toe-touch bathtub drain.
- Flip-it drain stopper: The flip-it drain stopper is operated by a lever near the drain.
- Push-pull tub stopper: The push-pull tub stopper is easy to remove. Grab the knob and pull it up.
A lift-and-turn tub stopper is the most common type. All of these bathtub drain stoppers have the same process to remove.

Wrapping Up:
Removing a lift and turning the tub drain stopper is not as complicated as it may seem.
With a little patience and some basic tools, you should be able to complete this task efficiently. Be sure to refer to the instructions in this post if you run into any trouble. Have fun removing bathtub drain stoppers!
Hofensanitary.com is a manufacturer and supplier of high-quality sanitaryware. If you have any questions or need help finding the right product, please get in touch with us today. We’re always happy to help!