
Lift &Turn Drain Stopper Introduction:
You can identify this cork by the small knob placed on the cap. With the aid of this knob, you can open or close the stopper by rotating movements. For instance, if you lift and turn the knob in one direction, the cork unlocks, while rotating the knob in the direction closes it. During installation, it requires the least effort. This stopper requires minor maintenance because of its simple design.
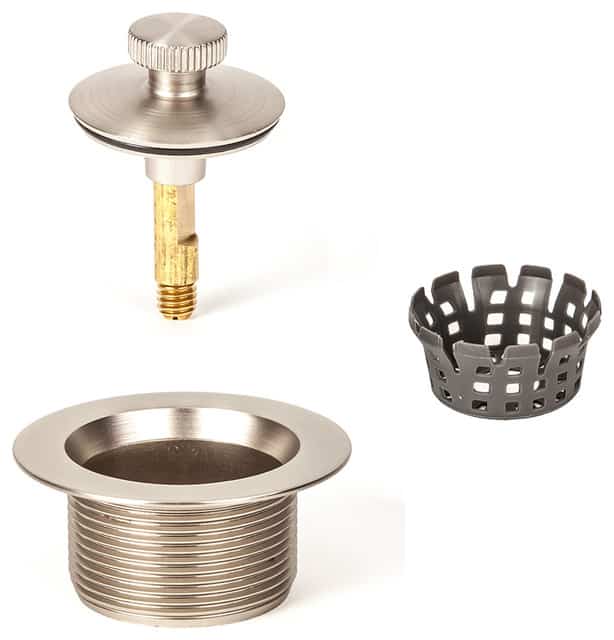
Please do not make the stopper over-tight; otherwise, it does not get stuck. The pin goes down and seals as you turn it a single way, and it lifts and opens. This channel plug has a middle set screw that winds into a thread drain crossbar. The set screw sits underneath the plug top cap. Lift and turn drain stoppers endure simple mechanical designs that require much concentration.
How do Lift and Turn Drain Stoppers work?
Lift and turn corks close and open by the twist motion with the hand. When closing, a pin in the cork aligns with a gap in the drain. The cork then drops into the place in the channel. It retains the cork in place more when it turns.
These corks are released when twisted by hand in the opposite direction. They tend to be spring-loaded. So, pop back into the general condition once the pin of the stopper becomes unaligned with the drain’s notch.
Advantages and Disadvantages of Lift and Turn Stopper
The lift-and-turn drain stopper characterizes by a small knob on the top of the cork. It used to twist it close and open. This kind of drain cork closes by rotating the knob on the top. It begins by lifting and turning the knob in the other direction. Due to its simple design, it is simple to use. Although, it may be difficult to remove this kind of stopper. This kind of difficulty only happens while over-tightened during the stopper installation.
How to Clean the Lift and Turn Drain Stopper
It is also essential to clean the drain stopper, especially the lift and turn drain stopper. Without the proper cleaning, your lift and turn drain stopper may be damaged before the actual time. Almost the same processes repeat to clean any drain stopper. Put all the screws and other loose items in a clean and safe place. These standard processes apply.
- End the trash with the aid of your hand
- Rinse the debris with faucet water.
- Scrub the drain stopper with dish soda liquid or baking soda with the help of a toothbrush. After that, rinse the trash with water.
- Soak the channel drain for up to 30 minutes. Fill the bowl with a cup of cleaning vinegar, dish liquid, and white vinegar. You can also apply a cup of vinegar or baking soda. Then, scrub the contents with a toothbrush. Rinse the debris off with water.
After that, dry the cork with a paper towel or washcloth. Always wash the clogged tube with a fresh cup of each baking soda or vinegar. If you do not have vinegar, apply a cup of salt as an alternative. If you see trash, use the pliers to remove the debris. You can also apply a plunger, drain snake, or coat hanger.
How to Reattach the Lift and Turn Drain Stopper
You must also learn to reinstall the lift and turn the drain stopper. You must follow the installation steps backward to reinstall any drain stopper. You can apply an electric drill for reinstallation if you do not have a screwdriver.
After the lift and turn, the drain stopper reinstalls and turns on the water to see if it’s usually working or do more. Must note what method to take the drain stopper. All lift-and-turn versions start by putting the cork back into the pipe drain.
Removable knob: Grab any loose screws, and put them inside the middle of the knob. If the screw is inside the knob center, avoid this step. After this, grab the screwdriver and turn it clockwise to tighten the cork. Tighten the knob by twisting it clockwise.
Screw-in Base: Shine the flashlight at the channel. Apply a screwdriver to tighten the cork’s screw to the thin, extended base.
Twist Style: Grab the Allen wrench and turn the bottom clockwise to tighten the cork.
How to Replace a Lift and Turn Bathtub Drain
Buy a new lift and turn drain stopper to replace the older one. If the cork in your lever-style bathtub drain does not pop up further due to the connection damage, replace it with a new and more straightforward lift and turn drain stopper.
The lift and turn channel does what its name implies. You lift and turn the plug to open the drain and turn it in the opposite direction to close it. Yet, the lift and turn bath channel cork has fewer mechanical parts than the bath channels.
Like trip lever plunger stoppers, over time, can sustain damage and become worn. When cracks and wear happen, the bath will never again hold water. We need you to replace the lift and turn the channel.
Step-1
Grab the handle on top of the channel cork. Pull up the channel fitting and turn it until it stays in the open or drain position. Check out the edge of the handle for a set screw. If the knob has a set screw, use a hex key or trim level head screwdriver to diminish the set screw. So, if your knob doesn’t have the set screw, turn the handle counterclockwise to stop it. It can overexpose the brass insert underneath the handle.
Step 2
Remove the brass insert by turning it counterclockwise with a level-head screwdriver. Lift the drain cork from the drain body.
Step 3
Insert the end of tongue-and-groove plier handles into the opening in the lower part of the channel body. Thread the metal shaft of a rock-solid screwdriver between the pliers’ handles.
Step 4
Grab the closures of the screwdriver with your hands. Use it as leverage to curve the channel body counterclockwise. Lift the first channel body from the bath and pull the first gasket from the bath channel opening.
Step 5
Insert another tub channel gasket into the tub channel opening. Carry out a dainty rope of handyman’s putty about the thickness of a drinking straw. Long enough to fold over the replacement lift and turn the drain body.
Step 6
Wrap the putty rope around the new channel body, putting it against the underside of the channel lip. Implant the new channel body into the tub channel opening—Hand-tight the drain body by turning it clockwise.
Step 7
Embed the finishes of tongue-and-groove plier handles into the opening in the new channel body. Use the heavy-duty screwdriver to turn the channel body pliers clockwise until tight. Clear enough, the handyman’s clay slimes underneath the new channel body with an old cloth.
Step 8
Drop the new plug into the replacement drain body. Embed the new brass insert into the center of the pin and fix it clockwise with a level-head screwdriver. Screw the handle clockwise onto the brass insert.
How to Remove a Lift and Turn Drain Stopper

The lift and tub turn drain stopper can be distinguished by its small thread knob on the pin. It’s like a push and pull the plug. The only difference from the knob of push & pull, which is fixed for the users to push the cork down and pull it up.
Required tools:
- Set of Allen wrenches
- Flathead screwdriver
Step 1
When the cork is in the open position, grip the body of the pin. Turn the cork knob and see a plain set screw on the knob. Suppose your cork has no visible set—screw on the knob. Yet, turn the pin counterclockwise until the cork unthreads from the filter.
Step 2
When your cork has a clear set, screw on the stopper knob, not unscrew. Then, you have one of two ways to lift and turn a pin. Set the screw beneath the stopper on the port shaft. With the cork still in the open position, lift the plug. Rotate it until you see a small screw. If you do not see the set screw, you have a cork that channels built-in around the pin.
There is a pin on the filter that the channel turns around to complete the lift and turn actions. Remove the cork and start turning the spigot counterclockwise. The slot beneath the track aligns with the pin on the filter, removing the cork to pull upwards.
Step 3
Requires either an Allen wrench or screwdriver to loosen the set screw. Usually, you do not need to end the screw. Lose it enough to remove the cork.
Step 4
Remove the cork from the post. You will not pull off the bar if your pin has a pair of set screws. Attempt loosening the set screw a little more. If the set screws, it will not slide off the post. There may be calcium build-up among the base and cork. Try to apply a force or external pressure or liquid wrench kind solvent as the pin lifts off the post.

Step 5
When the cork lifts off the post, unfasten the base from the filter.
Step 6
Remove the cork. If your pin does have a set screw, it does not remove off. But, it continues rotating with unscrewing. Yet, the post thread is stripping, and you must build pressure upwards. In contrast, you unscrew the cork, hoping to unfasten it from the filter. If the maneuver doesn’t work, separate the tub waste flange from the drain pipe.
Pro tip: Replacing the lift and turn cork with other stoppers is much simpler. Pulling up on the pin to open it with a lift and turn cork would be best. Searching for where the cork will remain or turn back down can be a hassle.
To attain more informative content, click here.