
Introduction
Bottle traps are essential to many modern bathroom setups, primarily under washbasins. They trap debris, preventing blockages deeper in the plumbing system and blocking sewer gases from coming up into your bathroom. If you’re thinking about installing a bottle trap by yourself, here’s a straightforward guide to assist you:
What is a Bottle Trap?
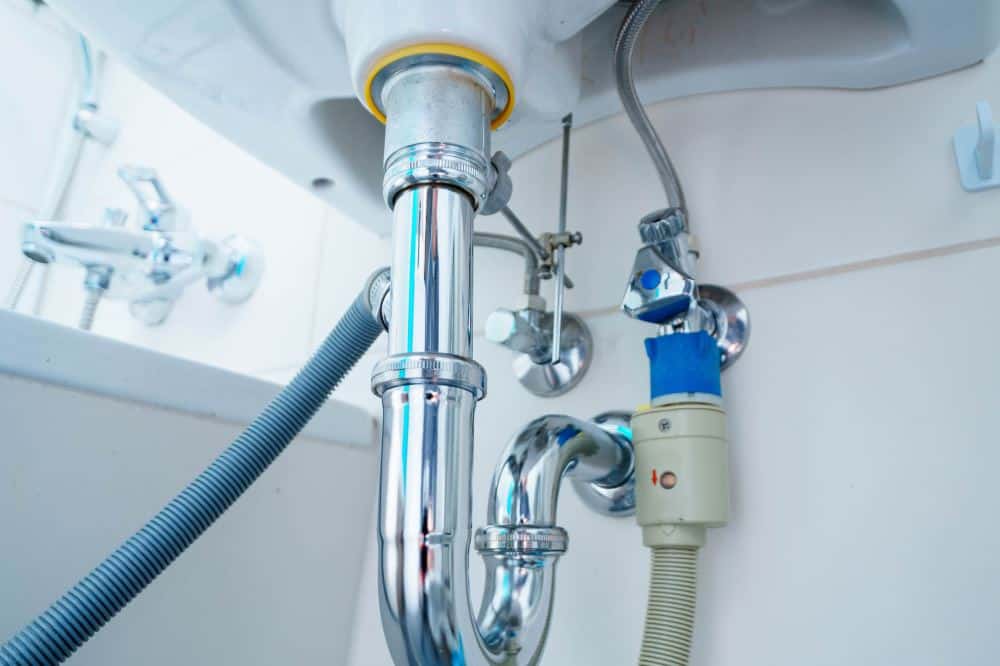
Bottle traps are a type of plumbing fixture that is installed in a drain pipe below the sink.
The bottle trap’s purpose is to catch and hold objects such as hair, food particles, and other debris that might clog the drain pipe.
The trap also serves to contain unpleasant odors from the sink area.
Although they are effective at trapping bad odors, bottle traps can be tricky to clean and may need to be replaced every few years.
Most bottle traps are made of plastic or metal and curved, similar to a wine bottle.
Key Benefits:
- It prevents clogging of the drainage system.
- It prevents bad smells from entering the home.
- It keeps insects and rodents away from the drainage system.
- It saves money on plumbing bills.
- It helps to hold onto any solid matter contained in wastewater.

How to Install a Bottle Trap?
Let’s get started!
Tools You Will Need:
- Pipe wrench
- Pliers
- Adjustable wrench
- Teflon tape
- Screwdriver (optional)
Step #1 Turn Off the Water Supply.
Before beginning any plumbing project, turning off the water supply is essential. This can be done by locating the main water shut-off valve and turning it off.
In most cases, this valve is located near the water meter. Ask your local water company if you’re unsure where it is.
Once the water is shut off, open all the faucets in your home to release any water in the pipes.
Step #2 Remove your inlet nut.
Located at the base of the bottle trap, the inlet nut is a large, threaded bolt that connects the trap to the sink’s drainpipe.
To remove it, use a pipe wrench to loosen it counterclockwise. Try using pliers or an adjustable wrench if it’s too tight to budge with a wrench.
Once the inlet nut is loose, remove it by hand and set it aside.
Step #3 Place the body of your bottle trap.
The body of the bottle trap can be placed in two different ways: over or under the sink.
If you’re placing it over the sink, hold the bottle trap against the drainpipe and ensure the inlet nut threads are lined up with the corresponding threads on the drainpipe. Then, tighten the inlet nut by hand.
If placing it under the sink, hold the bottle trap up to the drainpipe and follow the same process.
Step #4 Measure the distance between the drain stub-out to the outlet nut’s innermost edge.
When installing a bottle trap, knowing the distance between the drain stub-out and the outlet nut’s innermost edge is essential.
This measurement will determine the length of the pipe you’ll need to connect the bottle trap to the sink’s drainpipe.
Step #5 Ensure a proper compression fit.
When installing a bottle trap, it’s essential to ensure a proper compression fit between the trap and the sink’s drainpipe.
This is done by tightening the inlet nut by hand. If the fit is too tight, use a wrench to loosen the inlet nut before retightening it by hand.
Step #6 Insert your pipe into the bottle trap body’s side.
The pipe you’ll need to connect the bottle trap to the sink’s drainpipe can be either copper or PVC.
Using copper, use a tubing cutter to cut the pipe to the desired length. Then, use a crimping tool to attach a copper coupling to one end of the pipe.
Using PVC, use a hacksaw to cut the pipe to the desired length. Then, use PVC cement to attach a PVC coupling to one end of the pipe.
Once the coupling is in place, insert the pipe into the bottle trap body’s side opening and hand-tighten the nut to secure it.
Step #7 Slide the flange onto your pipe’s free end.
The flange is a circular piece of metal used to create a seal between the bottle trap and the sink’s drainpipe.
It is inserted onto the free end of the pipe and secured in place by tightening the nut by hand.
Step #8 Turn on your main water supply.
Turning on the main water supply is the final step in installing a bottle trap.
The main water shut-off valve is usually located near the water meter. It can be turned on by rotating it clockwise.
Once the water is turned on, you can test it.
Step #9 Test it!
After you’ve turned on the water supply, it’s time to test your bottle trap to ensure it’s installed properly and has no leaks.
To do this, pour a small amount of water into the sink and watch to see if it drains properly.
If it does, congratulations! You’ve successfully installed a bottle trap.

How to Replace Old Bottle Trap?
So you’ve decided to replace your old bottle trap. Maybe it’s starting to show its age, or you’re just ready for a change.
Replacing an old bottle trap is a relatively straightforward process that anyone can do with a few simple tools.
Here’s a step-by-step guide:
- Step #1 – Turn off the Water Supply: You’ll first want to turn off the water supply to your sink. This is usually done by shutting off the valves under your sink. If you’re unsure which valves control the water to your sink, you can shut off the main water supply to your home.
- Step #2 – Locate the trap: The second step is to locate the old bottle trap beneath your sink. This can be done by looking around for it under the sink or tracing the drain pipes until you find it.
- Step #3 – Unscrew the nut: Once you have located the trap, unscrew the nut that holds it in place. This can be done manually or with a wrench, depending on how tight the nut is. There will be two nuts – one on the top of the trap and one on the bottom. Unscrew both of these nuts.
- Step #4 – Remove the old trap: With the nuts loosened, you should be able to remove the old trap from beneath your sink. Simply pull it out and discard it.
- Step #5 – Clean the area: Once you have removed the old trap, take a moment to clean the area beneath your sink. This will help ensure that your new trap will fit properly and won’t have any leaks.
- Step #6 – Install the new trap: Now it’s time to install your new trap. Follow the steps described above to install your new trap, and you’ll be all set!
- Step #7 – Turn on the water supply: Finally, turn it on to your sink and test your new trap to ensure it works correctly. There should be no leaks, and the water should flow freely through the drain.
If you followed these steps, you should now know how to remove an old bottle trap and install a new one. This straightforward procedure may be accomplished in a matter of minutes.
General Steps.
Step-by-Step Installation:(Keywords)
1. Preparation:
- 1.1. Clear the area under the sink to give yourself ample workspace.
- 1.2. Place a bucket beneath the area where you’ll be working to catch any residual water.
2. Remove the Old Trap (if replacing):
- 2.1. Loosen the nuts holding the old trap in place using the adjustable wrench.
- 2.2. Once loosened, remove the trap and empty any trapped water into the bucket.
- 2.3. Clean the end of the waste pipe and the bottom of the sink outlet.
3. Check the Bottle Trap Kit:
- 3.1. Ensure all parts are present: the trap body, washers, nuts, and any extension pieces.
- 3.2. Familiarize yourself with each part so you know their order of installation.
4. Assemble the Trap:
- 4.1. Slide a nut onto the waste pipe, followed by a washer. Ensure the washer’s tapered side is facing towards the trap.
- 4.2. Screw the trap’s threaded end onto the waste pipe.
- 4.3. Attach any extension piece if required to align with the basin waste.
5. Connect to the Basin Waste:
- 5.1. Slide the other nut onto the basin waste, followed by its washer.
- 5.2. Make sure the washer is seated properly, ensuring a watertight connection.
- 5.3. Connect the top of the bottle trap to the basin waste, tightening the nut. Ensure a snug fit, but don’t overtighten.
6. Check for Leaks:
- 6.1. Turn on the tap and allow water to run through the trap.
- 6.2. Look for any signs of dripping or leaking around the newly installed trap. If there are leaks, try tightening the nuts slightly. If it persists, double-check the positioning of the washers.
7. Final Touches:
- 7.1. Clean and dry the area.
- 7.2. Return any items removed from under the sink to their original places.
Maintenance Tips:
- Clean your bottle trap regularly to prevent buildup and blockages. This will prolong its life and maintain its efficiency.
- If you experience any leaks in the future, it’s usually a sign of worn-out washers. Replacing them promptly can prevent potential water damage.
Conclusion: Installing a bottle trap is a straightforward process that homeowners can tackle with a bit of preparation and the right tools. Ensuring regular maintenance and being aware of its function can keep your bathroom plumbing running smoothly.
Chrome Bathroom Basin Sink Bottle Trap
Are you looking for an easy-to-install bottle trap for your bathroom sink? If so, the Chrome Bathroom Basin Sink Bottle Trap is a great option.
These Universal Round P Trap Waste Drain kits are simple to install and provide good water sealing performance.
In addition, they are easy to maintain. If you are unsatisfied with the product, our top-rated customer service team will make it right.
Orhemus Brass Round Bottle Trap:
Even the best-designed bathroom can look unfinished without the right accessories. That’s why it’s essential to choose your bottle trap carefully.
Orhemus’ Brass Round Bottle Trap is stylish and functional, with solid brass and stainless steel construction built to last.
The brushed gold finish is rust-resistant and perfect for exposed drain applications.
The 1-1/4 inch slip inlet and extension tube make installation easy, and the adjustable height ensures a snug fit for any basin sink.
The smooth interior won’t cause build-up over time, making it easy to clean and maintain.
Whether you’re looking for an afunctional or decorative bottle trap, the Orhemus Brass Round Bottle Trap is an excellent choice.
Nicmondo 1 1/4 Round Bottle Trap
A bottle trap is an essential component of any plumbing system, and the Nicmondo 1 1/4 Round Bottle Trap is an excellent option for those looking for an easy-to-install option.
This trap meets plumbing code requirements and is made from solid brass and stainless steel for durability.
The kit includes all the parts needed for installation, and the detachable design makes it easy to clean.
This is an excellent choice for a high-quality, easy-to-install bottle trap.
These easy-to-install bottle traps will add the perfect finishing touch to your bathroom. You can find the ideal option for your needs with some research.
